Welcome to the Saurabh School Management System (SSMS) Admin Panel — your school's all-in-one control center.
SSMS helps schools manage daily operations such as students, staff, fees, attendance, exams, communication, and reports from a single platform. This guide will walk you through each section of the system and show you how to use it effectively.
Key Benefits
Manage all school operations from a single dashboard
Maintain complete student and staff records
Track attendance for students and staff
Handle fee collection and financial reports
Manage exams, results, and events
Improve communication between parents and the school
2. Getting Started with SSMS
School Registration
To start using SSMS, the school must first complete the registration process:
Contact the SSMS implementation team
Provide the required school details and documents
Receive login credentials for the Super Admin panel
About This Guide
This user guide explains how to use each section of the SSMS Admin Panel step-by-step so that administrators can operate the system confidently and efficiently.
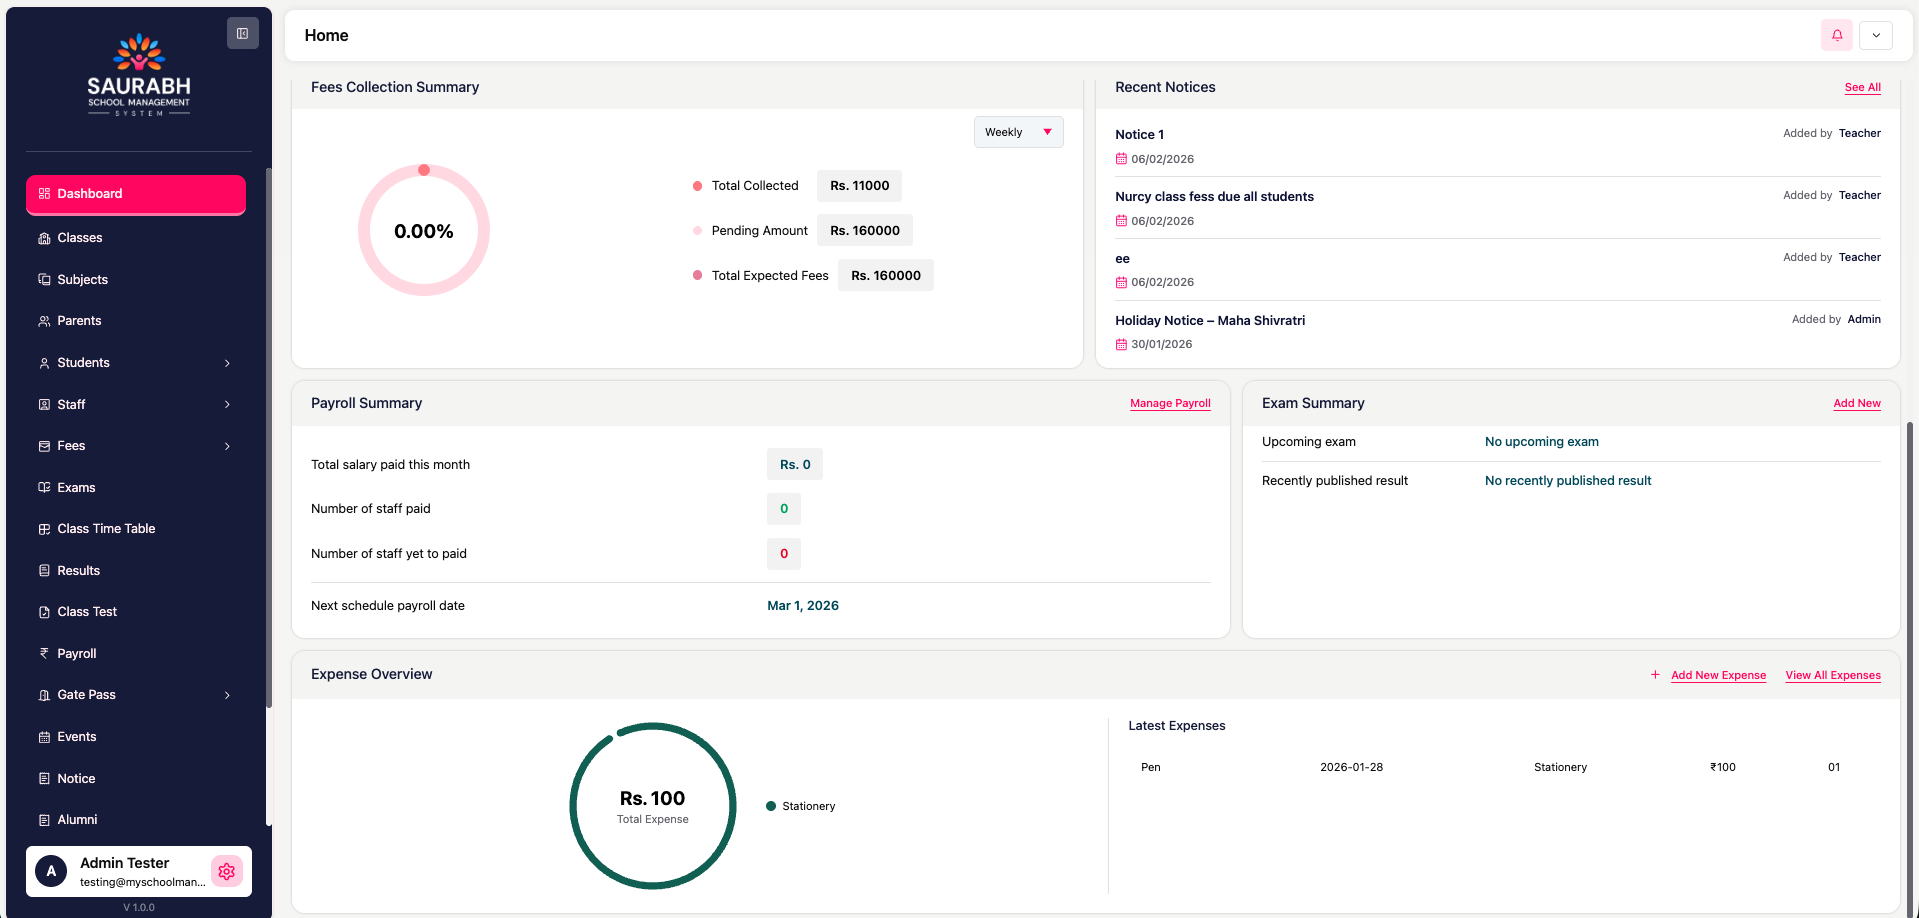
Dashboard Overview
After logging in, you will be directed to the Dashboard (Home) page. This page provides a real-time overview of key school activities and statistics, serving as your central daily monitoring screen.
Quick Statistics Cards
At the top of the dashboard, you will see summary cards with Add New buttons:
Total Students – View total students and quickly add a new student
Total Teachers – View total teachers and add new teacher
Other Staff – Count of non-teaching staff with add option
Total Classes – Total classes created with add option
These cards help you quickly navigate to core modules.
Attendance Report (Weekly View)
This section shows:
Student attendance percentage
Staff attendance percentage
A weekly chart from Monday to Saturday
Use this to monitor attendance performance for the current week.
Upcoming Events
Displays a list of:
Event name
Date and time
Who added the event (Admin/Teacher)
Click See All to view the complete events list.
Fees Collection Summary
This section provides a financial snapshot:
Total Collected Fees
Pending Amount
Total Expected Fees
Weekly collection progress (%)
This helps track fee performance instantly.
Recent Notices
Shows the latest notices shared by Admin or Teachers.
Each notice includes:
Title
Date
Added by (Admin/Teacher)
Click See All to view all notices.
Payroll Summary
Provides staff salary information:
Total salary paid this month
Number of staff paid
Number of staff yet to be paid
Next scheduled payroll date
Click Manage Payroll to open the payroll module.
Exam Summary
Quick exam status:
Upcoming exams (if any)
Recently published results
Use Add New to create a new exam.
Expense Overview
Tracks school expenses:
Total expense amount
Category of latest expense (e.g., Stationery)
Date and amount
Buttons for Add New Expense and View All Expenses
How to Use the Dashboard Effectively
Use the dashboard daily to:
Monitor attendance
Check fee collection status
Review upcoming events and notices
Track payroll and expenses
Quickly navigate to important modules using Add New buttons
✅
Pro Tip: The dashboard is designed to give you a complete snapshot of school operations in one screen.
Classes
Overview
The Classes module allows the admin to:
Create and manage grades or standards (e.g., Nursery, LKG, Class 1)
Add sections to each class (e.g., Section A, B, C)
Assign subjects to classes
Assign class teachers and substitute teachers for each section
Assign subject-specific teachers
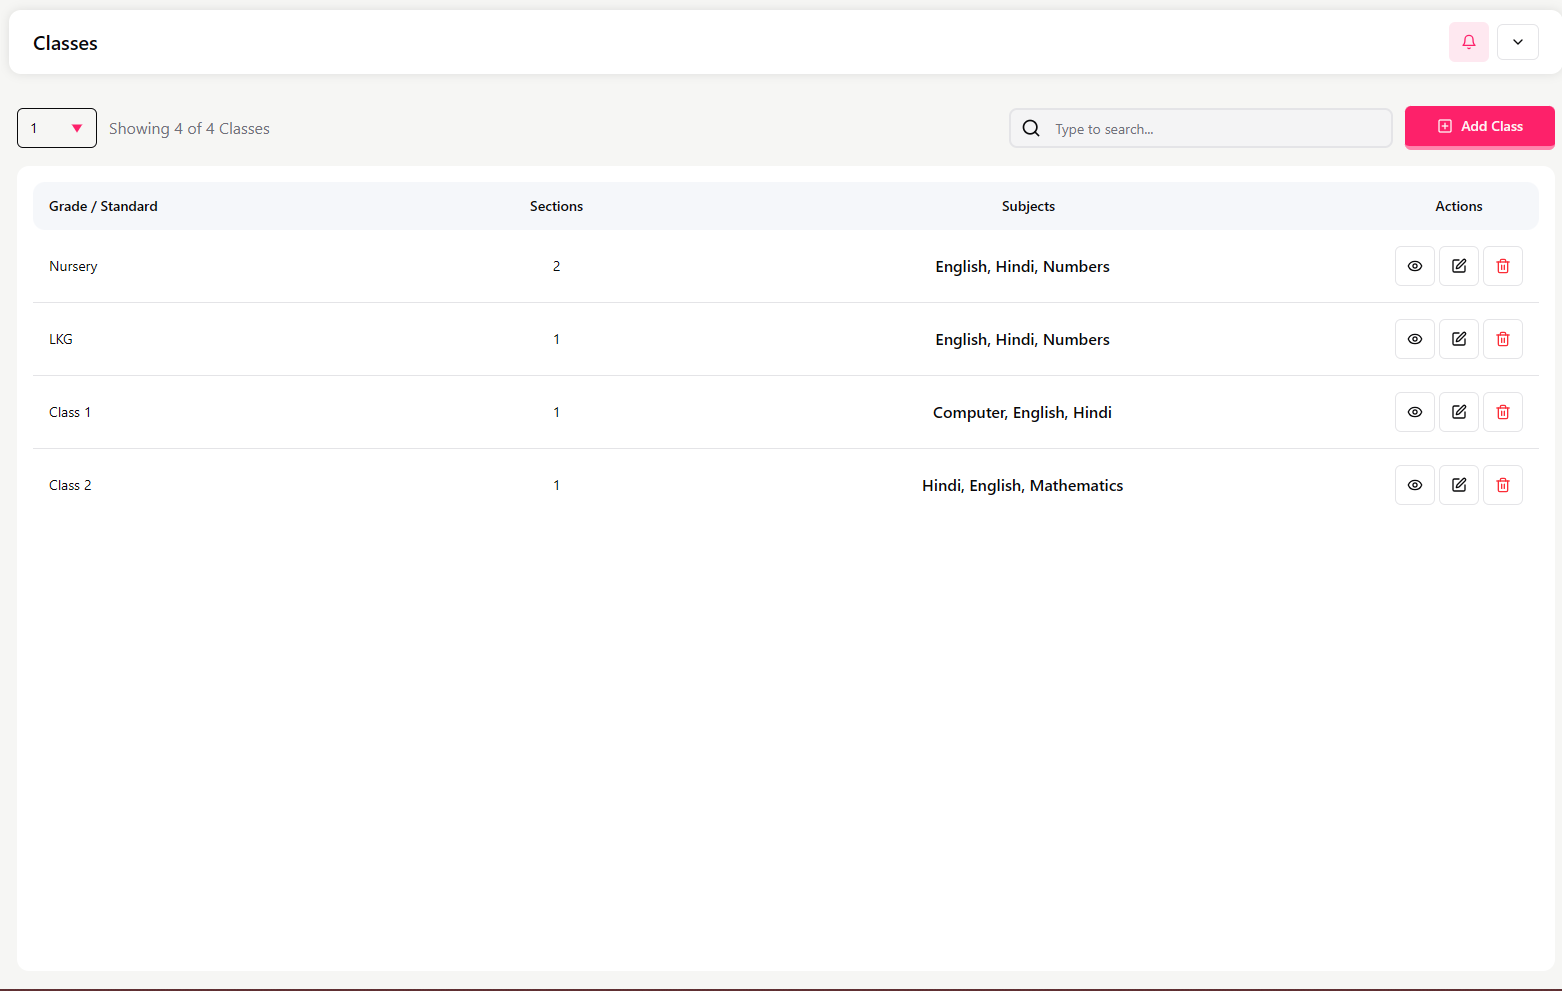
▶ Classes List Screen
This screen displays all created classes with the following information:
Grade/Standard Name – e.g., Nursery, Class 1, Class 2
Number of Sections – Total sections created under each class
Assigned Subjects – Subjects linked to the class
Action Buttons – Edit or manage class details
Actions available:
Use the search bar to quickly find a specific class
Click Add Class to create a new class
Add a New Class
To create a new class, follow these steps:
Click Add Class
Enter the Grade/Standard (e.g., Nursery, LKG, Class 1, Class 2)
Select Sections (e.g., A, B, C)
Assign Subjects to the class from the available subjects list
Assign a Class Teacher and Substitute Teacher for each section
Assign Subject-Specific Teachers to each subject. These teachers will appear in the dropdown selection as available options when creating the class timetable.
Click Save to create the class
▶ Edit Class
When editing an existing class, you can modify the following:
Grade/Standard
The class name is displayed (e.g., Nursery, Class 1)
Select Sections
Add or remove sections for the class (A, B, C, etc.)
Assign Subjects
💡
Prerequisite: Subjects must be created in the Subjects module before they can be assigned to a class.
Select subjects from the available list to assign to this class.
Example subjects:
English – Theory
Hindi – Theory
Numbers – Theory
Mathematics – Theory
Assign Class and Substitute Teachers
💡
Prerequisite: Teachers must be added in the Staff module before they can be assigned to classes.
For each section, assign the following:
Section
Class Teacher
Substitute Teacher
Section A
Rakesh Verma
Select Teacher
Section B
Neha Sharma
Select Teacher
Assign Teachers to Subjects
Assign specific teachers to handle each subject for this class.
Subject
Assigned Teacher
English – Theory
Rakesh Verma
Hindi – Theory
Select Teacher
Numbers – Theory
Select Teacher
💡
Important Notes
Subjects must be created in the Subjects module before they can be assigned to classes.
Teachers must be added to the Staff module before they can be assigned to classes or subjects.
Each section must have at least one class teacher assigned.
Substitute teachers are optional but recommended for continuity.
When to Use This Module
Use the Classes module when:
Setting up a new academic year
Adding new sections to existing classes
Updating subject allocations
Reassigning class teachers or subject teachers
Modifying class structure
Subjects
▶ Overview
The Subjects module allows the admin to:
Create and manage all school subjects
Define subject type (Theory, Practical, or Both)
Make subjects available for assignment in the Classes module
▶ Subjects List Screen
This screen displays all created subjects with the following information:
Subject Name – Name of the subject
Subject Type – Theory, Practical, or Theory + Practical
Search Bar – Quickly find a specific subject
Add Subject Button – Create a new subject
Example subjects:
Art – Theory / Practical
Computer – Theory
Drawing – Practical
English – Theory
Hindi – Theory
Java Programming – Practical
Mathematics – Theory
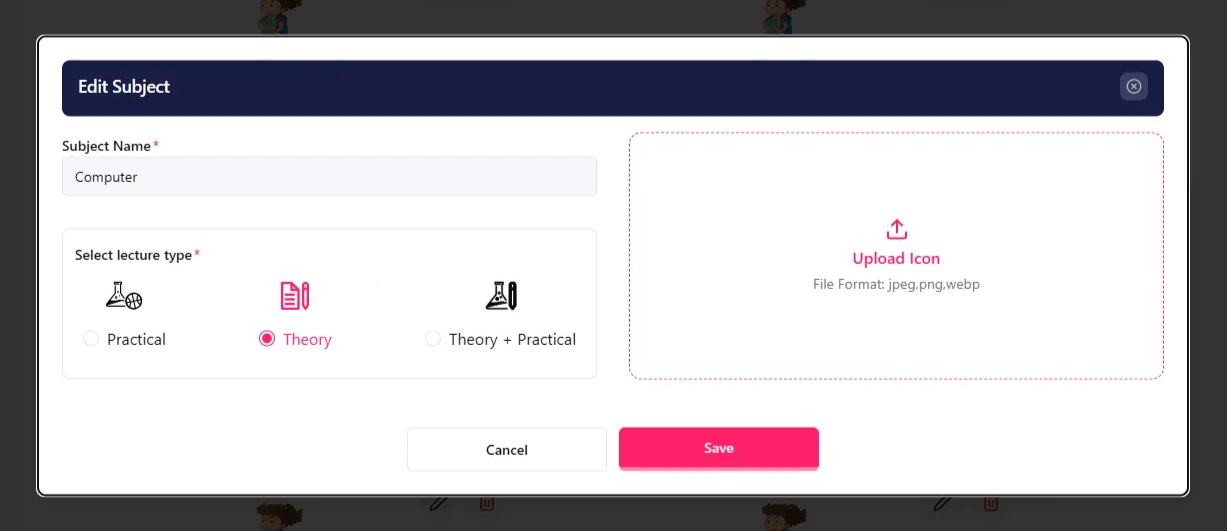
▶ Add a New Subject
To create a new subject, follow these steps:
Click Add Subject
Enter the Subject Name (e.g., Mathematics, Science, Computer, English)
Select the Subject Type:
Theory – Classroom-based theoretical instruction
Practical – Hands-on lab or practical work
Theory + Practical – Combination of both components
Click Save
The subject will now appear in the subjects list and become available for assignment when creating or editing classes.
Edit Subject
You can modify the following:
Subject name
Subject type (Theory, Practical, or Both)
💡
Important Notes
Subjects must be created in this module before they can be assigned to classes.
If a subject has both theory and practical components, select Theory + Practical.
Avoid creating duplicate subjects with similar names (e.g., Maths and Mathematics) unless there is a specific requirement.
Once a subject is assigned to a class, changes to the subject will reflect across all classes using it.
Parents
Overview
The Parents section allows the admin to:
View and manage parent records
See which students are associated with each parent
Update parent contact and address details
▶ Parents List Screen
This screen displays a list of all parents with:
Parent Name
Phone Number
Email Address
Address
Associated Students
Relationship to Student
Action buttons (Edit / View)
You can use the search bar to quickly find a parent.
Associated Students
For each parent, you can see:
Student name(s) linked to the parent
Relationship to the student (e.g., Father, Mother, Guardian)
This helps track families with multiple children in the school.
Students
Overview
The Students section allows the admin to:
View students class-wise and section-wise
Add new students
Import students in bulk
Manage complete student profiles
Track attendance, marks, fees, homework, and documents
▶ Students List Screen
At the top, select:
Class (e.g., Nursery)
Section (e.g., A)
This filters the student list.
The table displays:
Photo
Roll Number
Student Name
Class
Section
Actions (View / Edit)
Add New Student
Click Add Student and complete the multi-step form:
Step 1 – Personal Details
Required information:
First Name, Last Name
Date of Birth
GR Number (General Register Number) – Must be unique
Phone Number
Gender
Profile Photo
Blood Group
Caste Category
Aadhaar Card Number
Click Save & Next
Step 2 – Academic Information
Class assignment:
Class – Must be created in the Classes module first
Section – e.g., A, B, C
Roll Number
Admission Details – Date and other relevant information
⚠️
Important: The selected class must have a fee group assigned. If no fee group exists, the system will show an error.
Click Save & Next
Step 3 – Parent/Guardian Information
At least one parent's details are required. After creating the student, a parent account is automatically created.
For each parent (Father/Mother/Guardian):
Full Name
Phone Number
Email Address (Required)
Occupation
Complete Address
Click Save & Next
Step 4 – Health & Medical Details
Enter any relevant medical information
Allergies, conditions, medications, etc.
Click Save & Next
Step 5 – Document Uploads
Upload the following documents:
Birth Certificate
Address Proof (Aadhaar, Utility Bill, etc.)
Previous School Transfer Certificate (if applicable)
Report Card of Last Grade Attended (if applicable)
Click Save & Next
Step 6 – Transport Preferences
Select transport mode (if applicable)
Choose route or pickup location
Add any special instructions
Click Save & Confirm
Result: The student will now appear in the Students List.
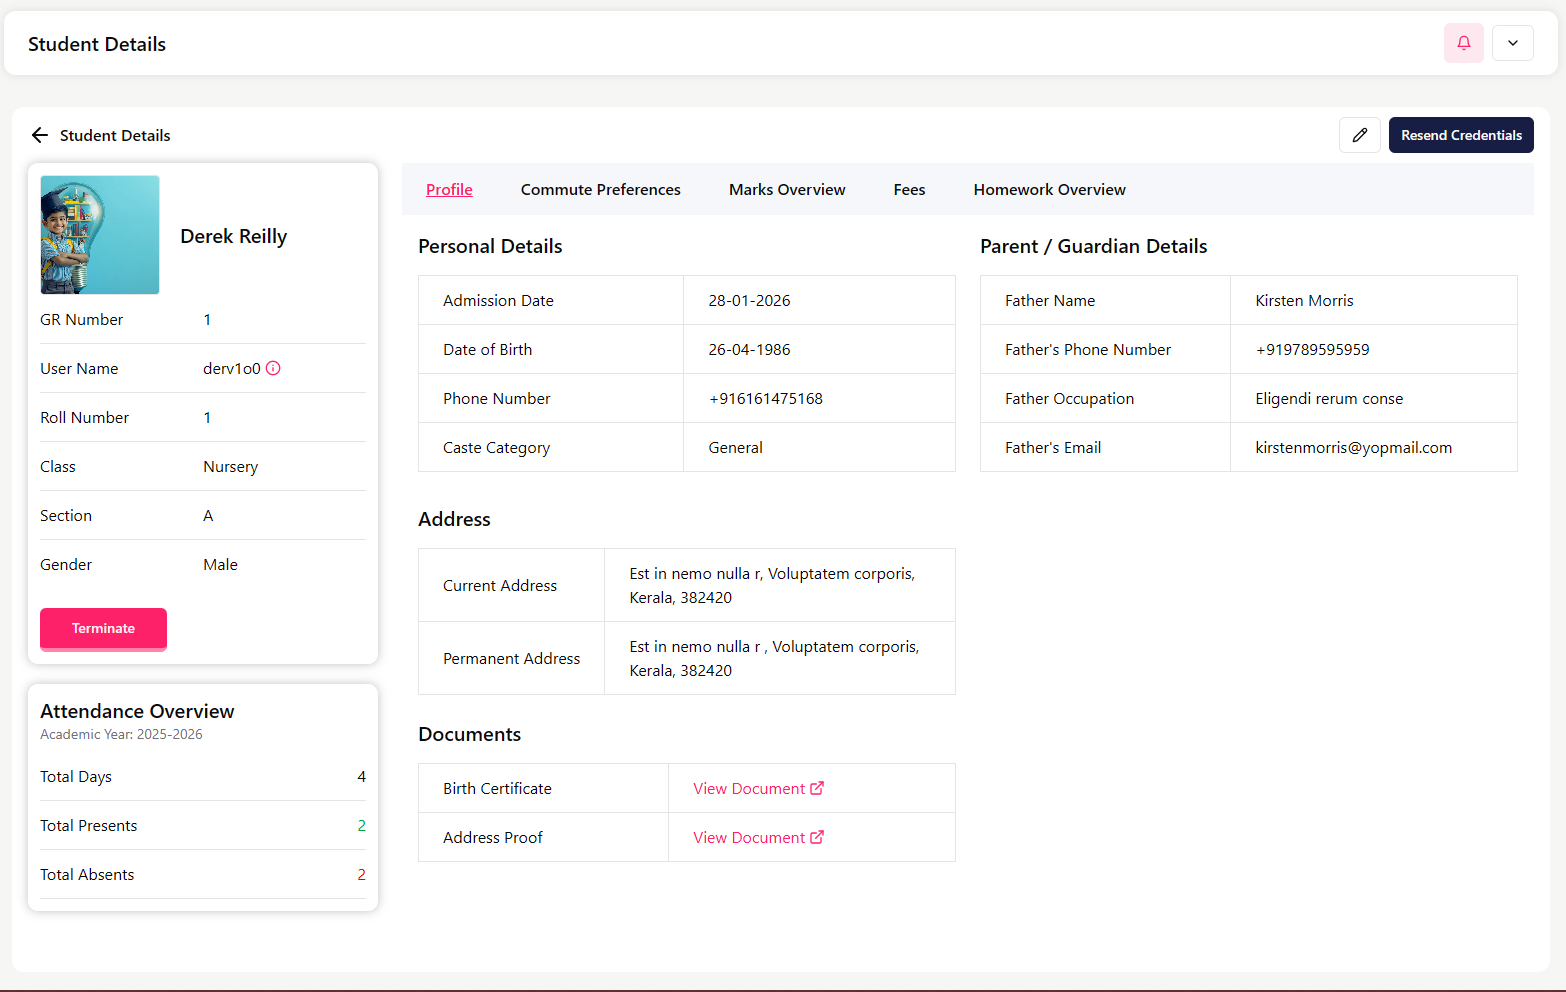
Student Details Page
Click on a student to open the full profile.
Basic Info
GR Number
Username
Roll Number
Class & Section
Gender
Admission Date
Available Actions:
Resend Credentials – If student/parent forgot login credentials, admin can resend them. Parent will receive an email at the registered email address
Terminate – Use when student leaves school
Attendance Overview
Total days
Presents
Absents
Academic year summary
Profile Tabs Inside Student
You can navigate through:
Profile (personal details)
Commute Preferences
Marks Overview
Fees
Homework Overview
▶▶ Tab: Profile (Personal Details)
This tab contains the student's personal, address, parent, and document details.
Personal Details
Admission Date
Date of Birth
Phone Number
Caste Category
Address Details
Current Address
Permanent Address
Parent / Guardian Details
Father / Guardian Name
Phone Number
Occupation
Email Address
Documents
Uploaded documents can be viewed here:
Birth Certificate
Address Proof
Use View Document to open the uploaded file.
▶▶ Tab: Commute Preferences
This tab shows the student's transport and commute-related settings for the academic year.
Information Displayed:
Academic Year (e.g., 2025–2026)
Transport Active – Indicates whether the student is using the school transport service (Yes / No)
Transport Months – Displays the months for which transport service is applicable (e.g., June)
This information helps the admin:
Verify whether transport fees should be applied to the student
Check transport eligibility during fee collection
Track which students are using the school transport facility
▶▶ ▶▶ Tab: Marks Overview
This tab shows the student's academic performance for the selected academic year.
This graph gives a quick visual idea of how the student is performing in each subject.
Recent Exams & Tests
Below the graph, you can see recent assessments taken by the student.
Each entry shows:
Exam/Test Name (e.g., Unit Test, Main Exam)
Date of the exam
Subject
Marks obtained out of total marks
Example:
Class Test (English) – 15 out of 25
Main Exam – 40 out of 300
📊
How This Helps: This tab helps the admin or teacher to quickly review student performance, track progress across different tests and exams, and identify weak or strong subjects.
▶▶ ▶▶ Tab: Fees Overview
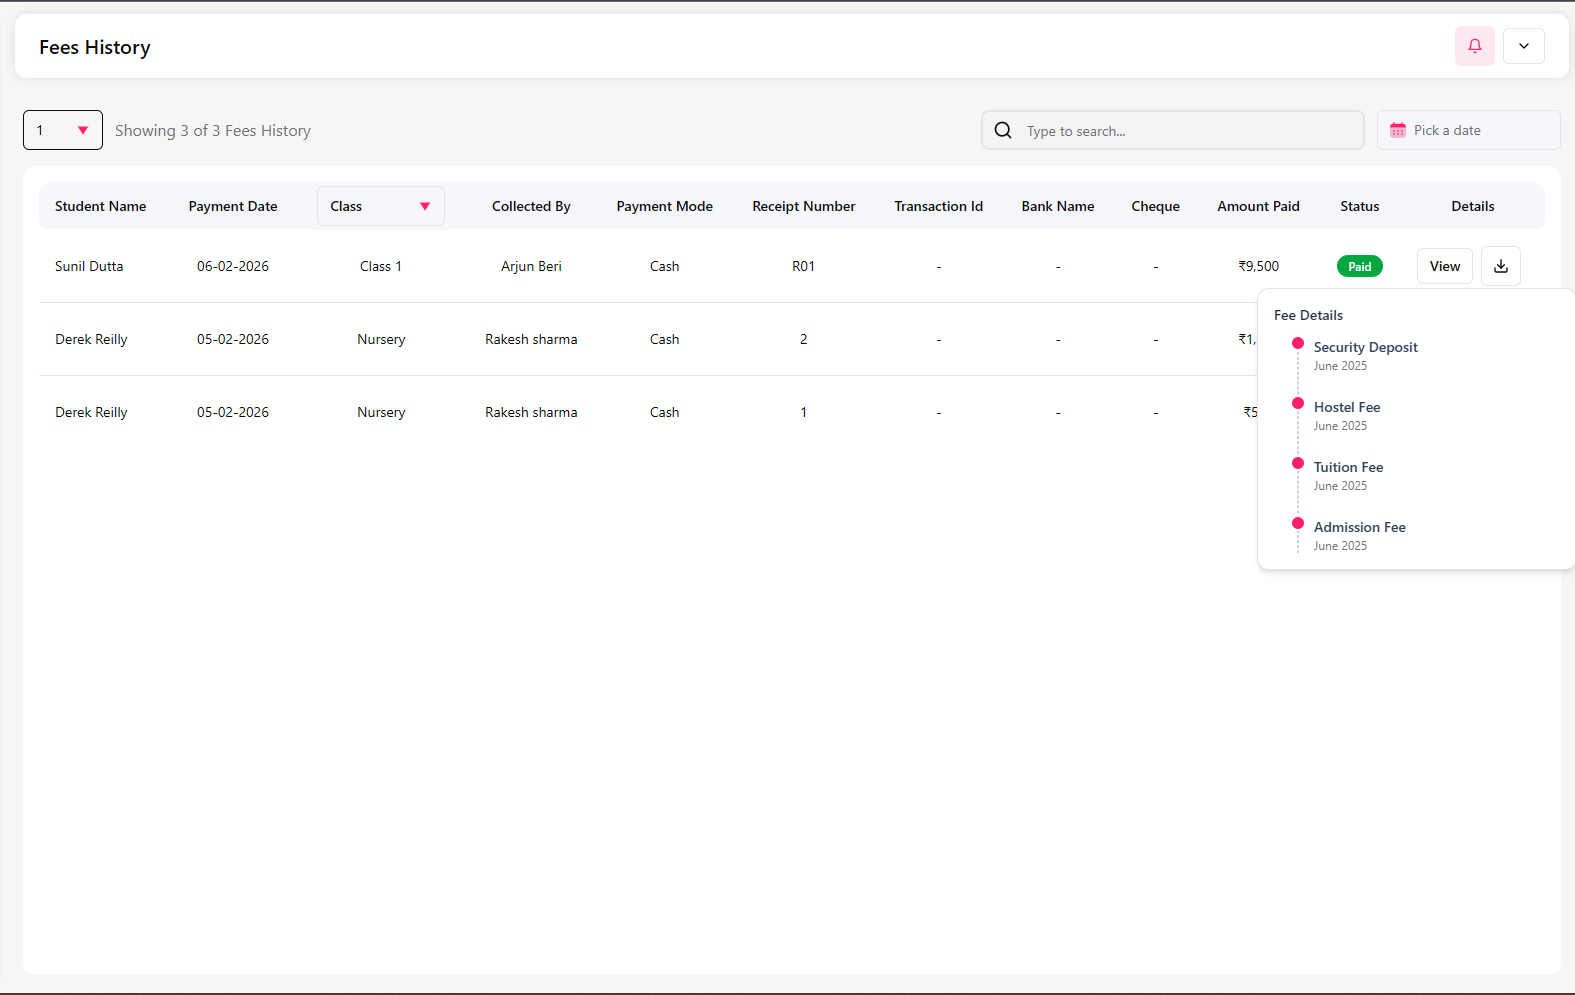
This tab provides a complete summary of the student's fee status for the selected academic year.
Fee Summary:
Academic Year (e.g., 2025–2026)
Total Fees Amount (e.g., ₹80,500)
Total Paid Fees Amount (e.g., ₹1,500)
Upcoming Fees Total Amount (e.g., ₹79,000)
This gives a quick understanding of how much the student has paid and how much is pending.
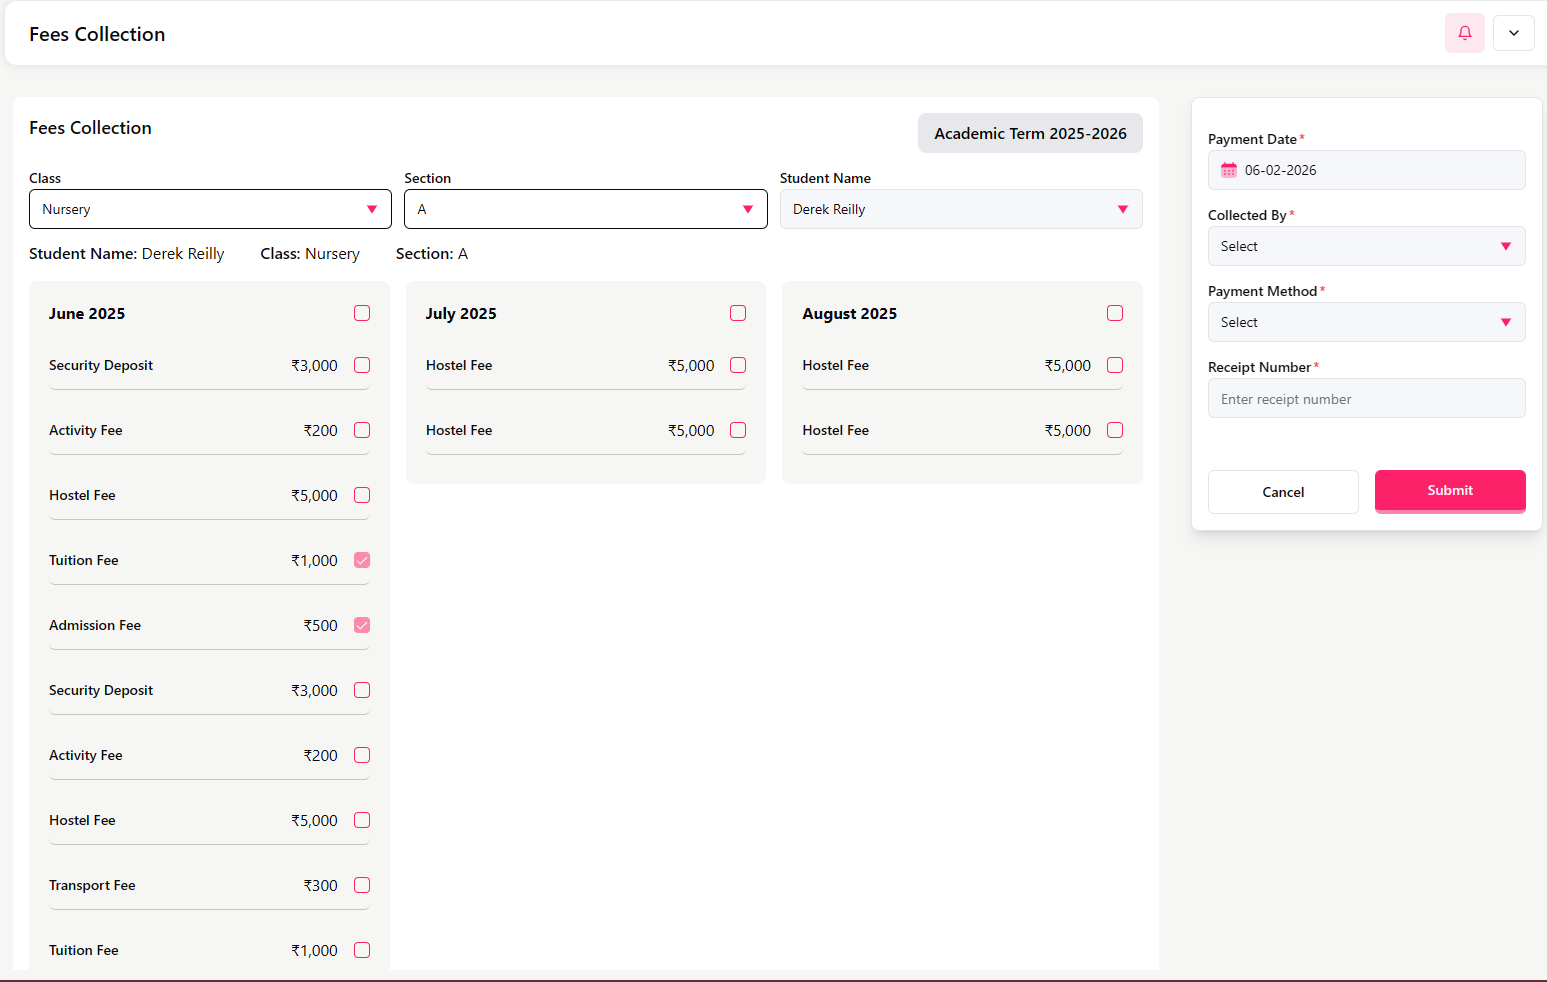
Current Fees Structure (Month-wise)
Below the summary, you can see the month-wise fee breakdown as defined in the Fees Group.
Each fee item is marked as:
P (Paid) – Fee has been collected
Pending – Fee is yet to be collected
Example:
June 2025
Security Deposit – Paid
Activity Fee – Paid
Hostel Fee – Paid
Tuition Fee – Paid
Admission Fee – Paid
Transport Fee – Paid
July 2025 onwards
Hostel Fee – Pending
…and so on for each month of the academic year.
💰
How This Helps: This tab helps the admin quickly check student fee payment status, identify pending months, verify which fee components are already paid, and cross-check with Fees Collection and Fees History records.
▶▶ ▶▶ Tab: Homework Overview
This tab shows the student's homework performance for the selected academic year.
Below the summary, you can see homework status divided by subject.
Example:
Subject
Completed
Incomplete
English
2
0
This helps track how regularly the student is completing homework for each subject.
📝
How This Helps: This tab helps the admin and teachers monitor student discipline in homework, identify subjects where homework is being missed, and track overall homework completion performance.
## Student Leave Management
Overview
The Student Leave section allows the admin to:
View all leave applications submitted for students
Approve or reject leave requests
Track leave history by student, class, and dates
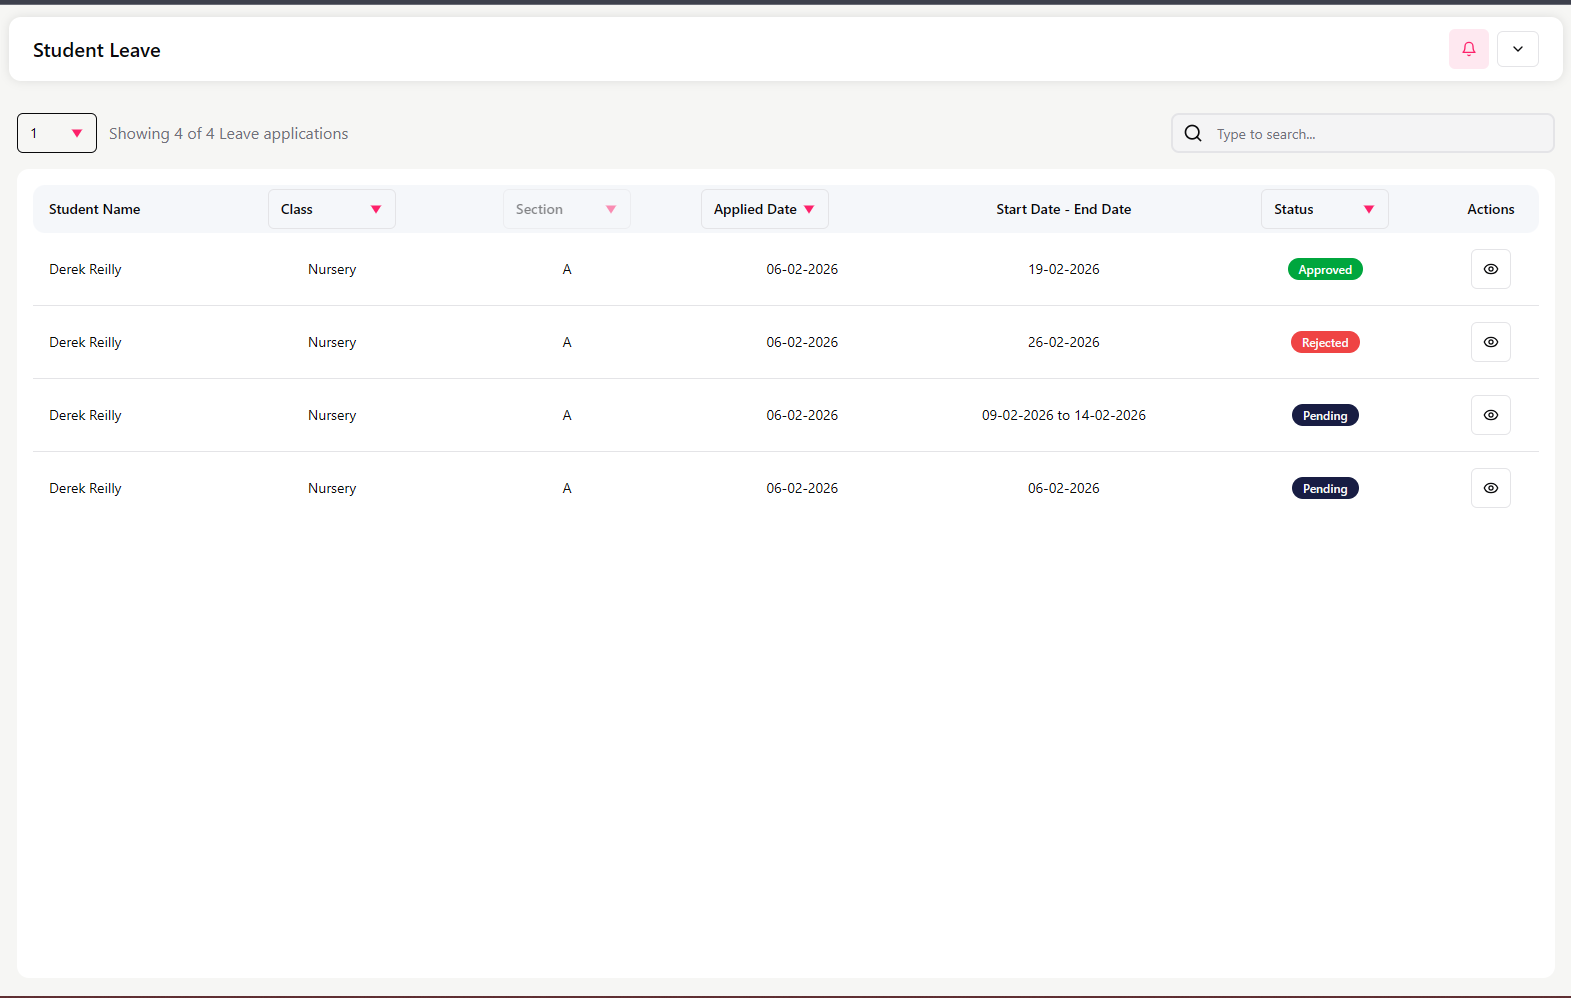
Leave Applications List Screen
This screen displays all student leave requests with the following details:
Student Name
Class
Section
Applied Date
Leave Duration (Start Date – End Date)
Status (Approved / Rejected / Pending)
Action buttons
Use the search bar to quickly find a leave request.
Leave Status Types
Each leave request will have one of the following statuses:
Pending – Waiting for teacher approval
Approved – Leave has been granted
Rejected – Leave request has been denied
Leave Request Details
Locate the leave request from the list
Click the Action button
Review the leave details
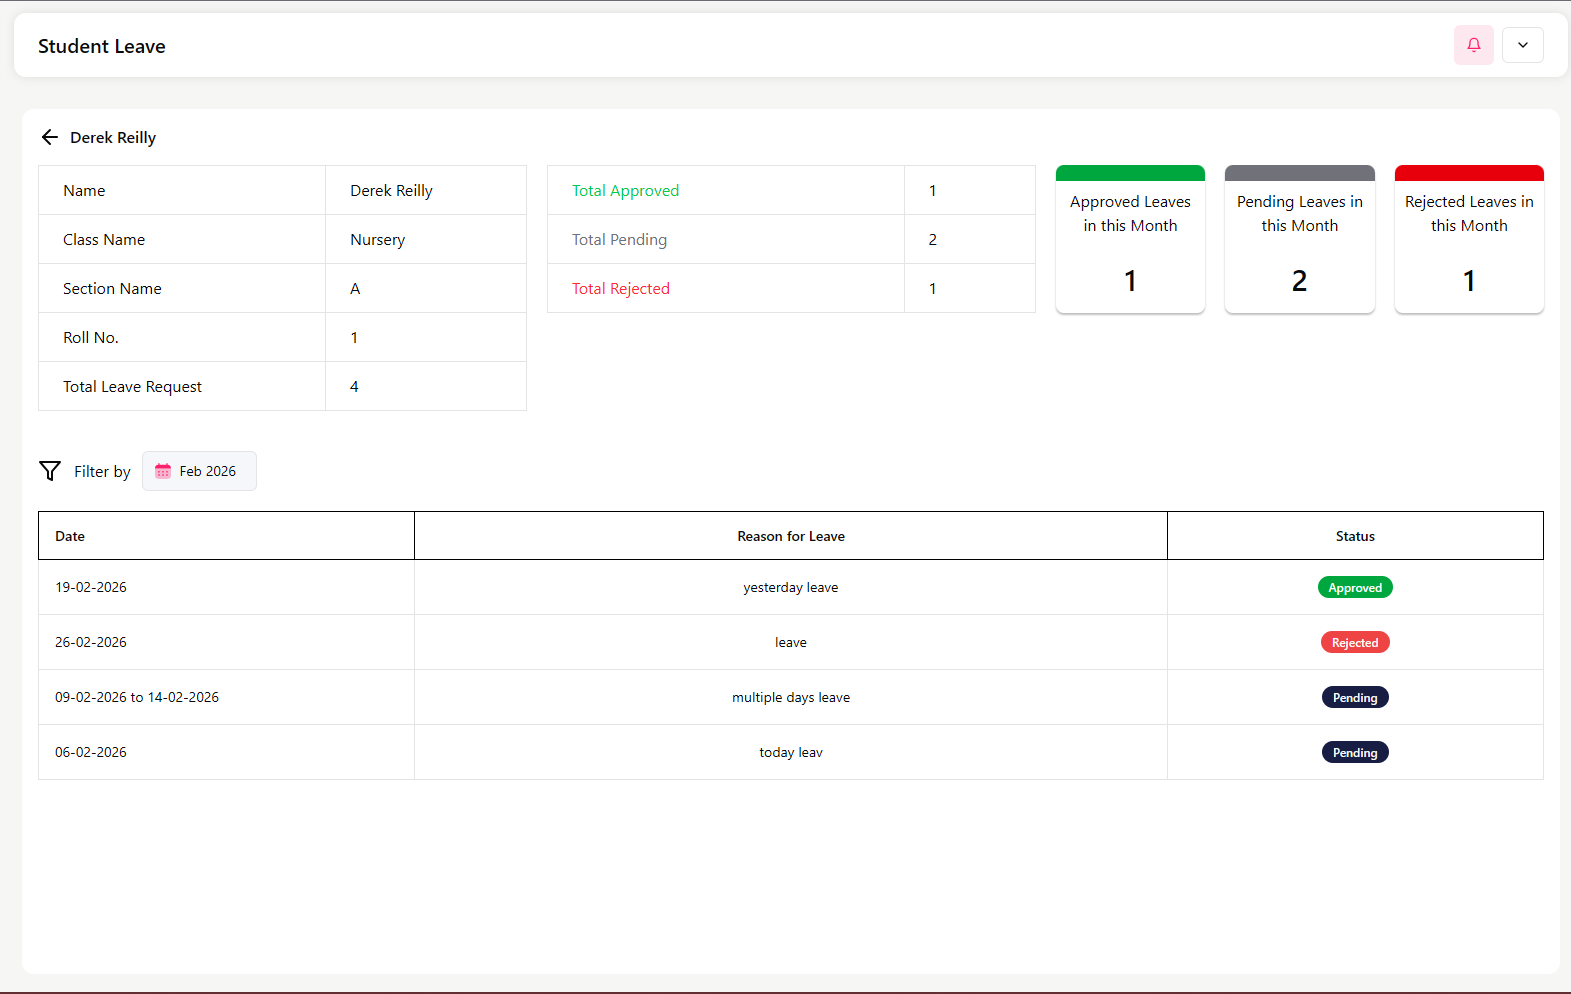
View Student Leave Details
When you click View from the leave list, you can see the complete leave history and summary for that student.
Student Leave Summary
At the top of the page, you will see:
Student Name
Class Name
Section Name
Roll Number
Leave Statistics:
Total Leave Requests
Total Approved Leaves
Total Pending Leaves
Total Rejected Leaves
Monthly Summary:
Approved leaves in the current month
Pending leaves in the current month
Rejected leaves in the current month
Filter by Month
You can filter leave records month-wise (e.g., February 2026). This helps track leave activity for a specific period.
Leave Records Table
The table shows detailed leave entries:
Date or Date Range
Reason for Leave
Status (Approved / Rejected / Pending)
This gives a clear view of all leave applications submitted by the student.
Student Attendance
Overview
The Student Attendance section allows the admin to:
Check daily attendance for students class-wise and section-wise
Track attendance status for a specific date
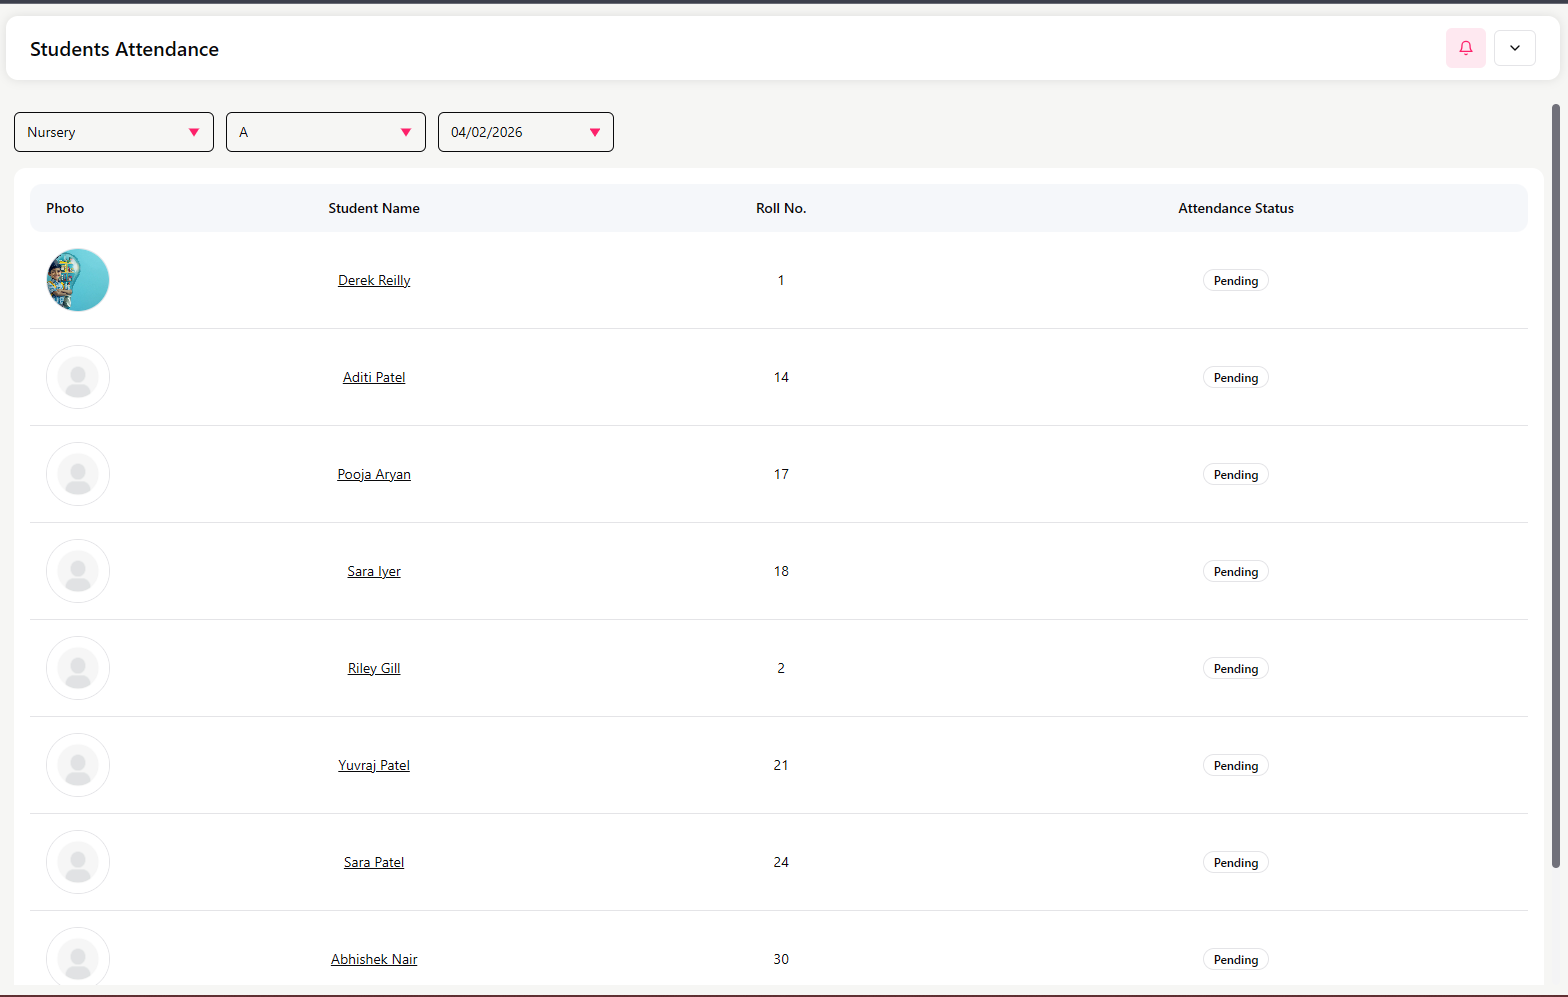
Attendance Marking Screen
At the top of the screen, select:
Class (e.g., Class 1)
Section (e.g., A)
Date (e.g., 06/02/2026)
This loads the student list for that class and section.
Student Attendance List
The table displays:
Student Photo
Student Name
Roll Number
Attendance Status (initially shown as Pending)
Staff Management
The Staff section allows the admin to:
Add and manage teaching and non-teaching staff
Maintain complete employee profiles
Assign subjects and responsibilities
Store salary, bank, and document details
Track staff information for payroll and attendance
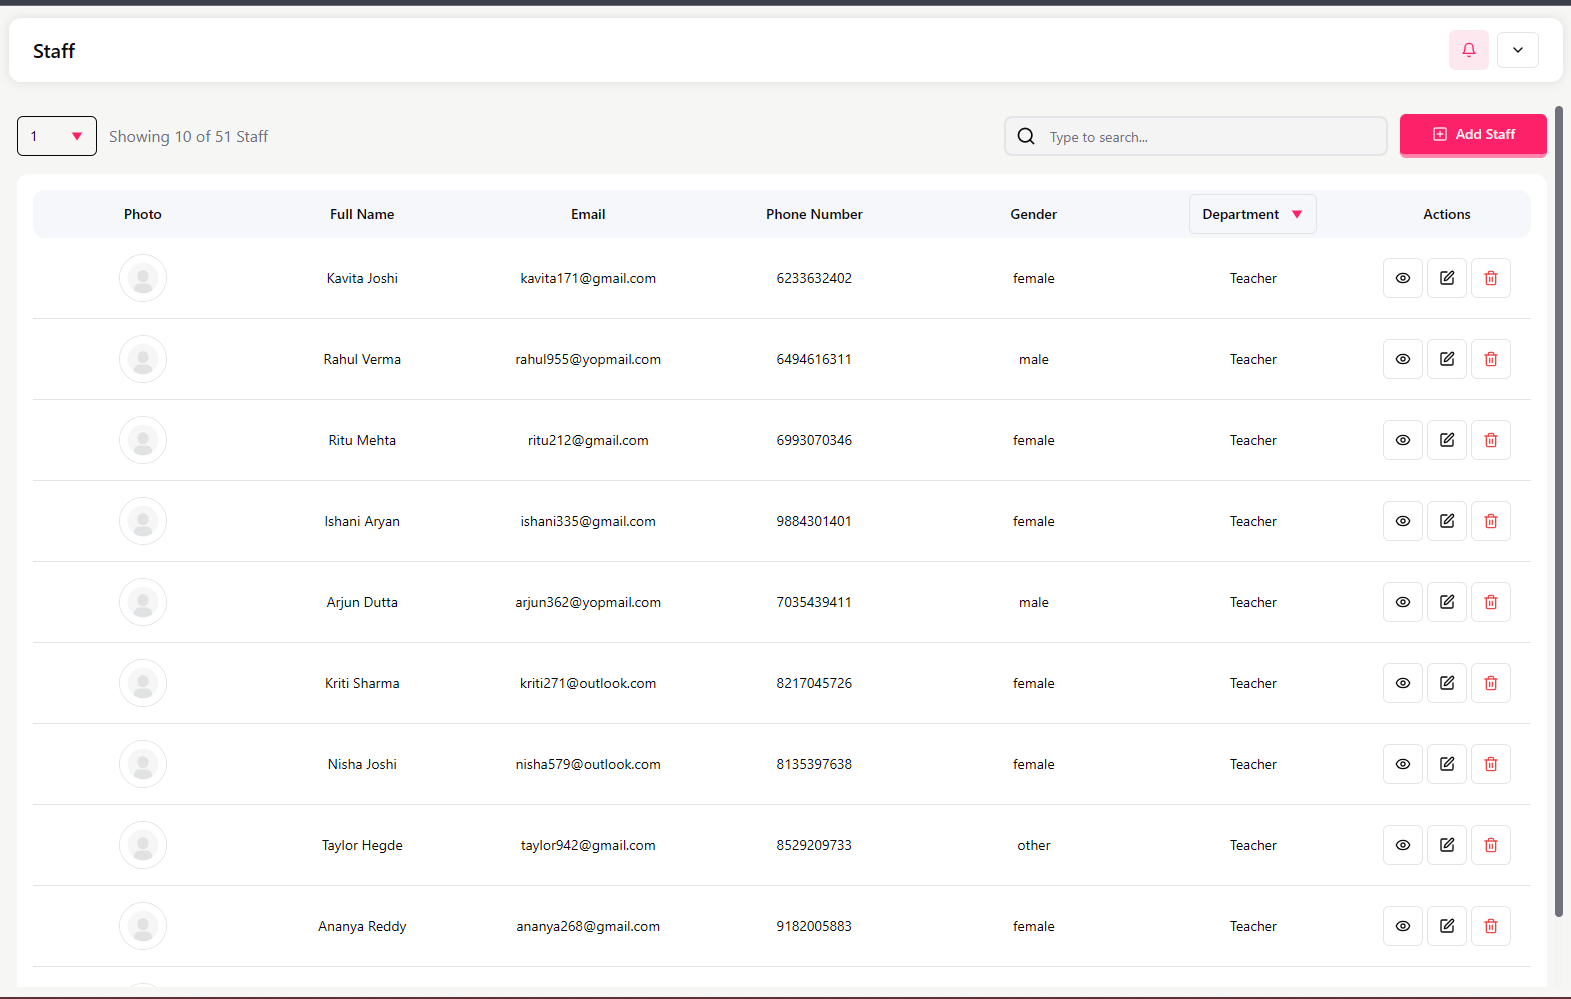
Staff List Screen
This screen displays all staff members with:
Photo
Full Name
Email
Phone Number
Gender
Department (e.g., Teacher)
Action buttons (View / Edit)
Use the search bar and department filter to quickly find a staff member.
Click Add Staff to create a new staff profile.
Add or Edit Staff (Multi-step Form)
When adding or editing staff, complete the following steps:
Step 1 – Personal Details
Basic information:
First Name, Last Name
Date of Birth
Gender
Blood Group
Profile Photo
Click Save & Next
Step 2 – Contact Details
Contact information:
Phone Number
Email Address
Current Address (Full)
Permanent Address (Full)
Click Save & Next
Step 3 – Designation & Additional Info
Role and responsibilities:
Staff Type – e.g., Teacher, Accountant, Principal
Prerequisite: Roles must be created in the Role Management module first
Subjects Handled – Only available when staff type is Teacher
Prerequisite: Subjects must be created in the Subjects module first
Additional Responsibilities – Any extra duties
Click Save & Next
Step 4 – Employment Details
Professional information:
Employee ID (Unique identifier)
Joining Date
Qualification (Degree/Certification)
Years of Experience
Previous Employment Details
Click Save & Next
Step 5 – Salary & Financial Details
Payment information:
Salary Amount (Monthly)
Bank Name
Account Holder Name
Account Number
IFSC Code
Aadhaar Card Number
Click Save & Next
Step 6 – Emergency Contact Information
Emergency contact:
Contact Name
Relation to Staff Member
Phone Number
Click Save & Next
Step 7 – Document Uploads
Upload required documents:
Resume/CV
Educational Certificates
ID Proof
Address Proof
Any other relevant documents
Click Save
Result: The staff member's profile will be created, and login credentials will be sent to their email.
Staff Profile Page
When viewing a staff profile, you can see:
Employment Details
Employee ID
Role
Joining Date
Qualification
Subjects
Responsibilities
Personal Information
Photo
Name
Email
Phone
Gender
Address
Emergency Contact
Name
Relation
Phone
Salary & Financial Details
Salary amount
Bank details
Aadhaar number
Buttons available:
Resend Credentials
💡
Important Notes
Staff must be created before assigning them to classes or Subjects.
Salary details are required for Payroll processing.
Subjects assigned here will be available for class allocation.
Staff Schedule
The Staff Schedule section allows the admin to:
View the weekly timetable of any staff member
See which class, section, and subject a teacher is assigned to
Understand daily teaching periods and break times
Select Staff Member
At the top of the screen:
Use Select Staff
Choose the staff member (e.g., Rakesh Verma)
The weekly schedule for the selected staff member will be displayed.
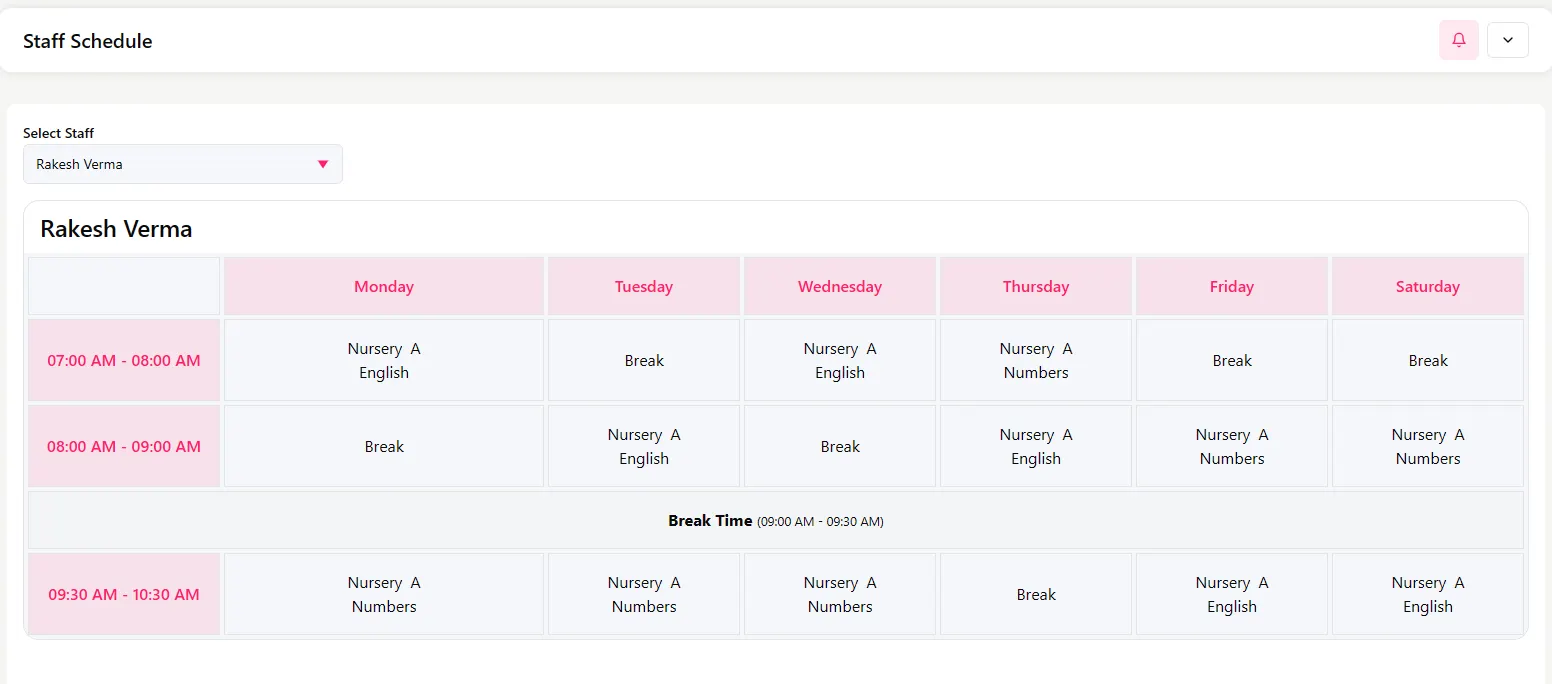
Weekly Schedule View
The schedule is displayed in a table format with:
Days of the week (Monday to Saturday)
Time slots for each teaching period
Break times are clearly indicated
Assigned class, section, and subject for each period
Example entry inside a time slot:
Class: Nursery
Section: A
Subject: English / Numbers
Break periods are marked as Break or Break Time.
Time Slot Structure
Each row represents a time slot, such as:
07:00 AM – 08:00 AM
08:00 AM – 09:00 AM
Break Time (09:00 AM – 09:30 AM)
09:30 AM – 10:30 AM
This helps in understanding the teacher’s daily workload.
Important Notes
The schedule is based on the Class Time Table configuration.
Any changes in the class timetable will reflect here automatically.
Staff Leave Management
Purpose
The Staff Leave Management section allows the admin to:
View leave applications submitted by staff members
Approve or reject leave requests
Track leave history and monthly summaries
##
Leave Applications List Screen
This screen displays all staff leave requests with:
Staff Name
Role (Teacher, Accountant, etc.)
Applied Date
Leave Type (Sick Leave, Half Day Leave, Casual Leave, etc.)
Leave Duration (Start Date – End Date)
Status (Approved / Rejected / Pending)
Action button (View)
Use the search bar to quickly find a leave request.
##
Leave Status Types
Each leave request will have one of the following statuses:
Pending – Waiting for admin approval
Approved – Leave has been granted
Rejected – Leave request has been denied
View Staff Leave Details
Click View to open the complete leave record for that staff member.
##
Staff Leave Summary
At the top of the page, you can see:
Staff Name
Staff ID
Department
Total Leave Requests
Total Approved, Pending, and Rejected leaves
Monthly summary:
Approved leaves in the current month
Pending leaves in the current month
Rejected leaves in the current month
##
Filter by Month
You can filter leave records month-wise (e.g., February 2026).
##
Leave Records Table
This table shows:
Date
Leave Type
Reason for Leave
Status (Approved / Rejected)
When to Use This Module
Use the Staff Leave Management module when:
Staff members apply for leave
You need to approve or reject leave requests
You want to review staff leave history
##
Staff Attendance
The Staff Attendance section allows the admin to:
Mark daily attendance for all staff members
Track attendance by date
Record Present, Absent, or Partial status
Maintain attendance records for payroll and reporting
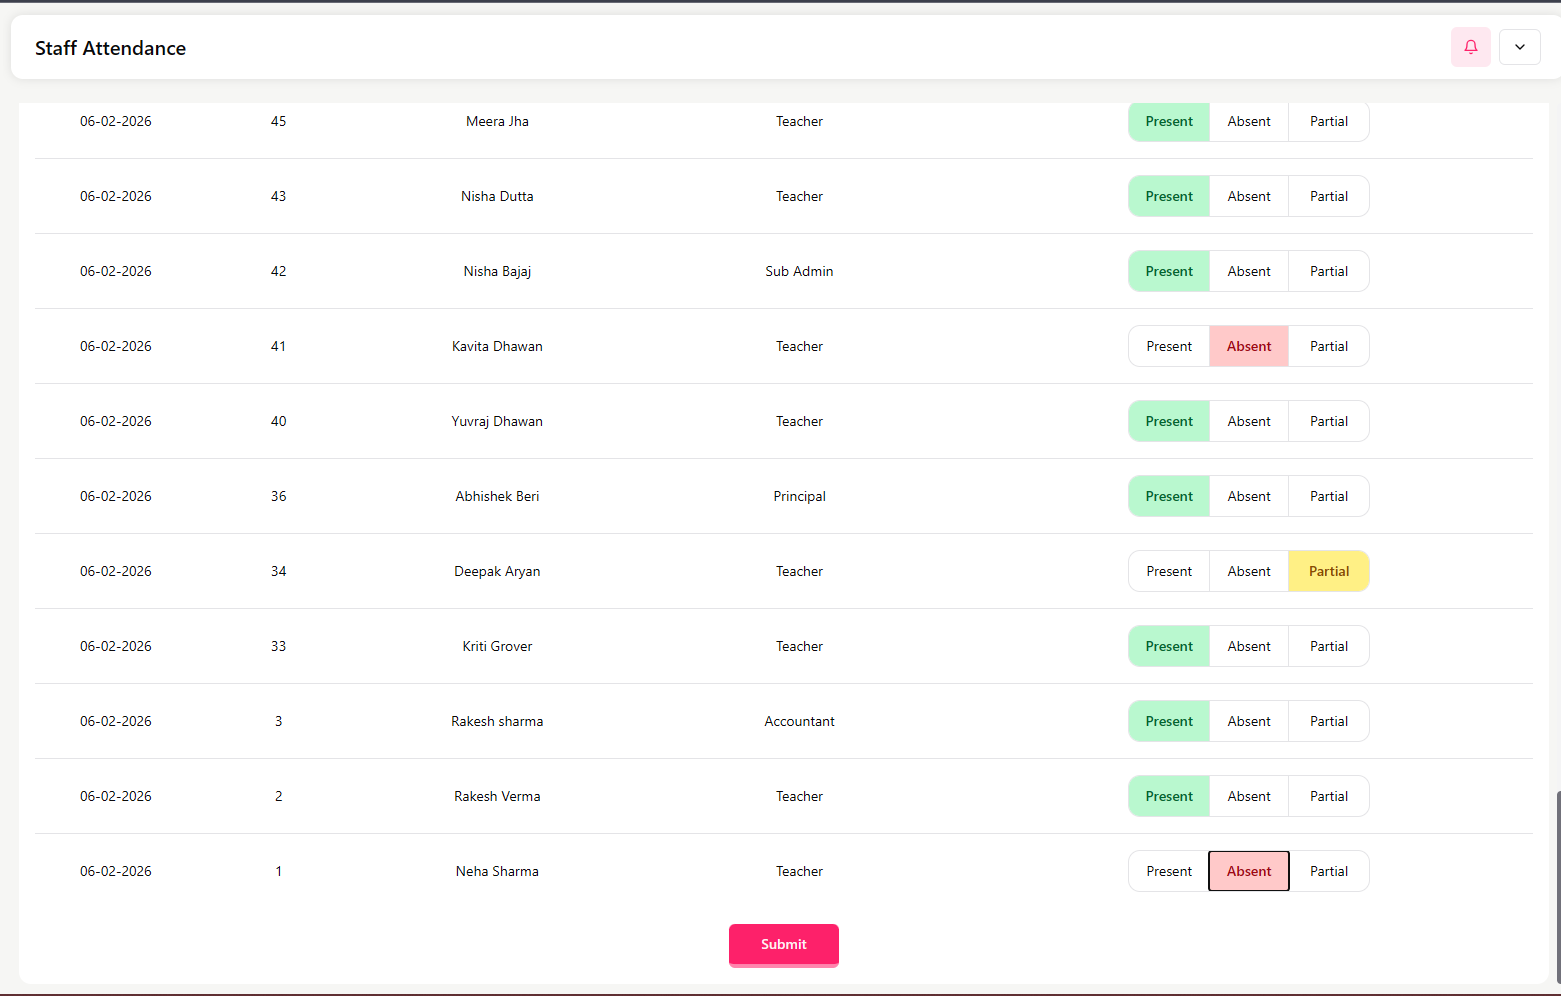
Attendance Screen
At the top of the screen:
Select or confirm the Date (e.g., 06-02-2026)
Use the search bar to quickly find a staff member
The table displays:
Date
Staff ID
Staff Name
Department (Teacher, Accountant, Principal, Sub Admin, etc.)
Attendance Status options
How to Mark Attendance
For each staff member:
Select one of the following:
Present
Absent
Partial
Repeat for all staff listed
Click Submit after marking attendance
Attendance Status Types
Present – Staff attended the full day
Absent – Staff was not present
Partial – Staff attended for part of the day
💡
Important Notes
Attendance must be marked daily for accurate payroll processing.
If attendance is not submitted, records may remain incomplete.
This attendance data is used in reporting and salary calculations.
You can click on any subject to swap or change the subject for that date.
This helps adjust the exam schedule easily.
Click Save & Confirm after verifying the timetable.
Important Notes
Subjects are pulled from the Classes configuration.
Holidays and Sundays cannot be selected.
Always review the preview carefully before confirming.
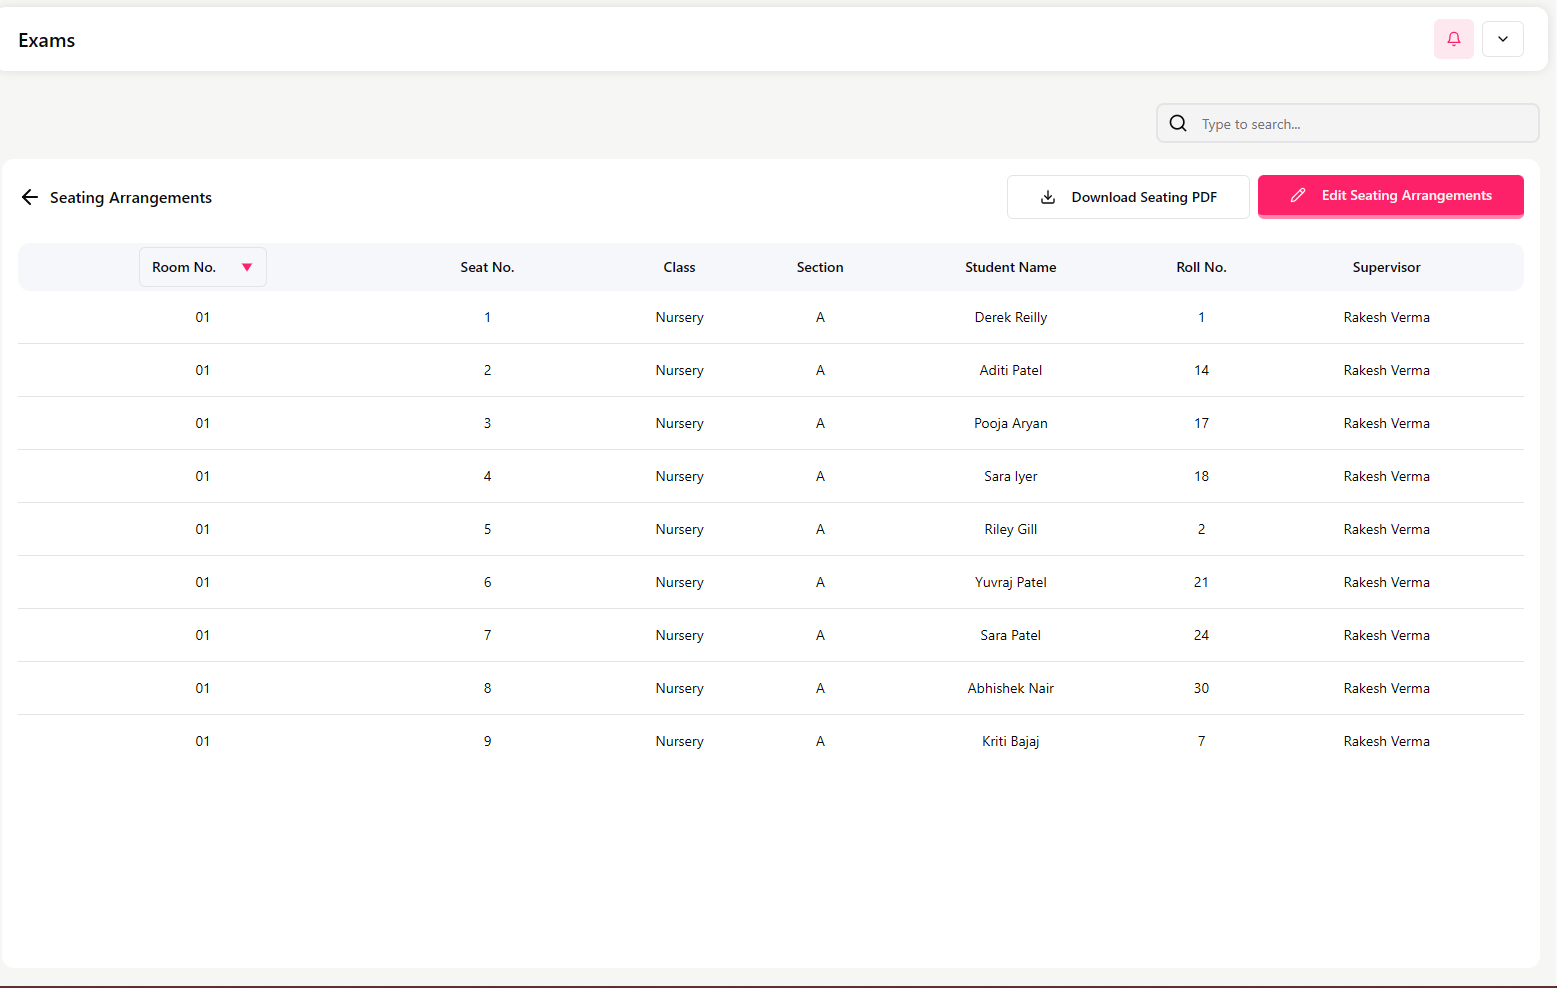
Seating Arrangements
Click View Seating Arrangements to see how students are allocated to rooms and seats under an exam.
Seating List Screen
This table shows:
Room Number
Seat Number
Class
Section
Student Name
Roll Number
Supervisor (teacher)
You can download this list using Download Seating PDF.
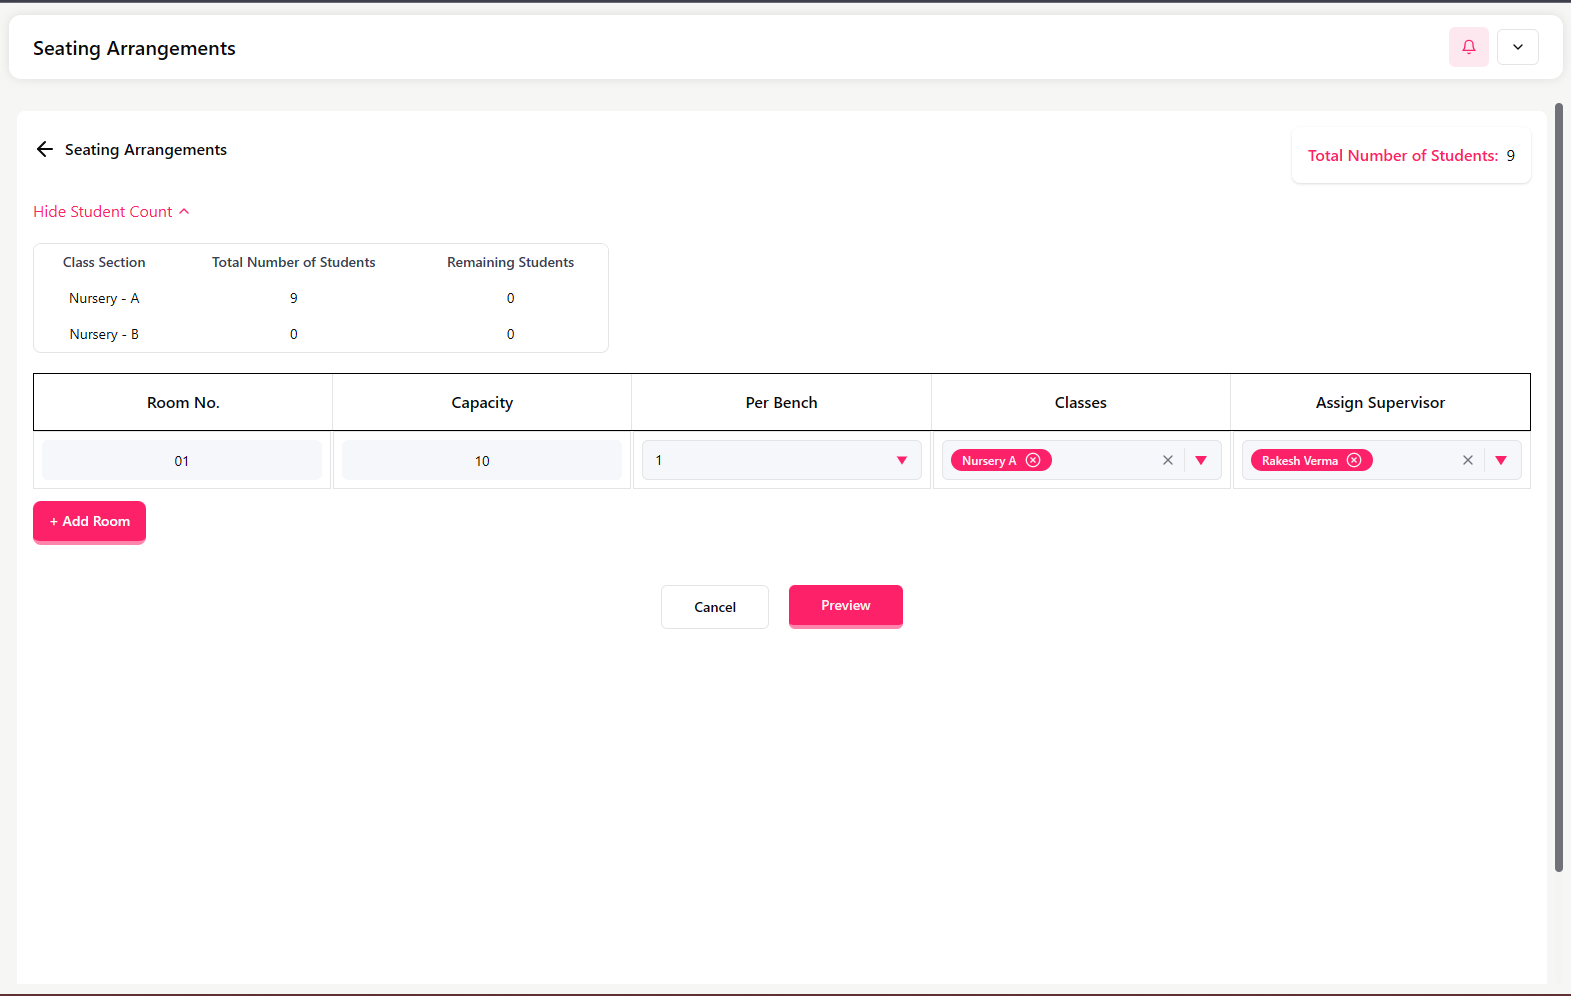
Edit Seating Arrangements
Click Edit Seating Arrangements to configure rooms and supervisors.
You can set:
Total number of students
Class and section student count
Room number
Room capacity
Students per bench
Assign supervisor (teacher)
Use + Add Room to create additional rooms.
Click Preview to review before saving.
Important Notes
The seating arrangement is based on student count in each class/section.
Supervisors must be staff members created in the Staff module.
Always preview before confirming.
When to Use This Module
Use the Exams module when:
Creating exam schedules
Managing exam seating
Generating seating and exam PDFs
Class Time Table
The Class Time Table section allows the admin to:
Create and manage daily schedules for each class and section
Assign subjects and teachers to specific time slots
Define school timings, period duration, and break time
Automatically reflect schedules in Staff Schedule
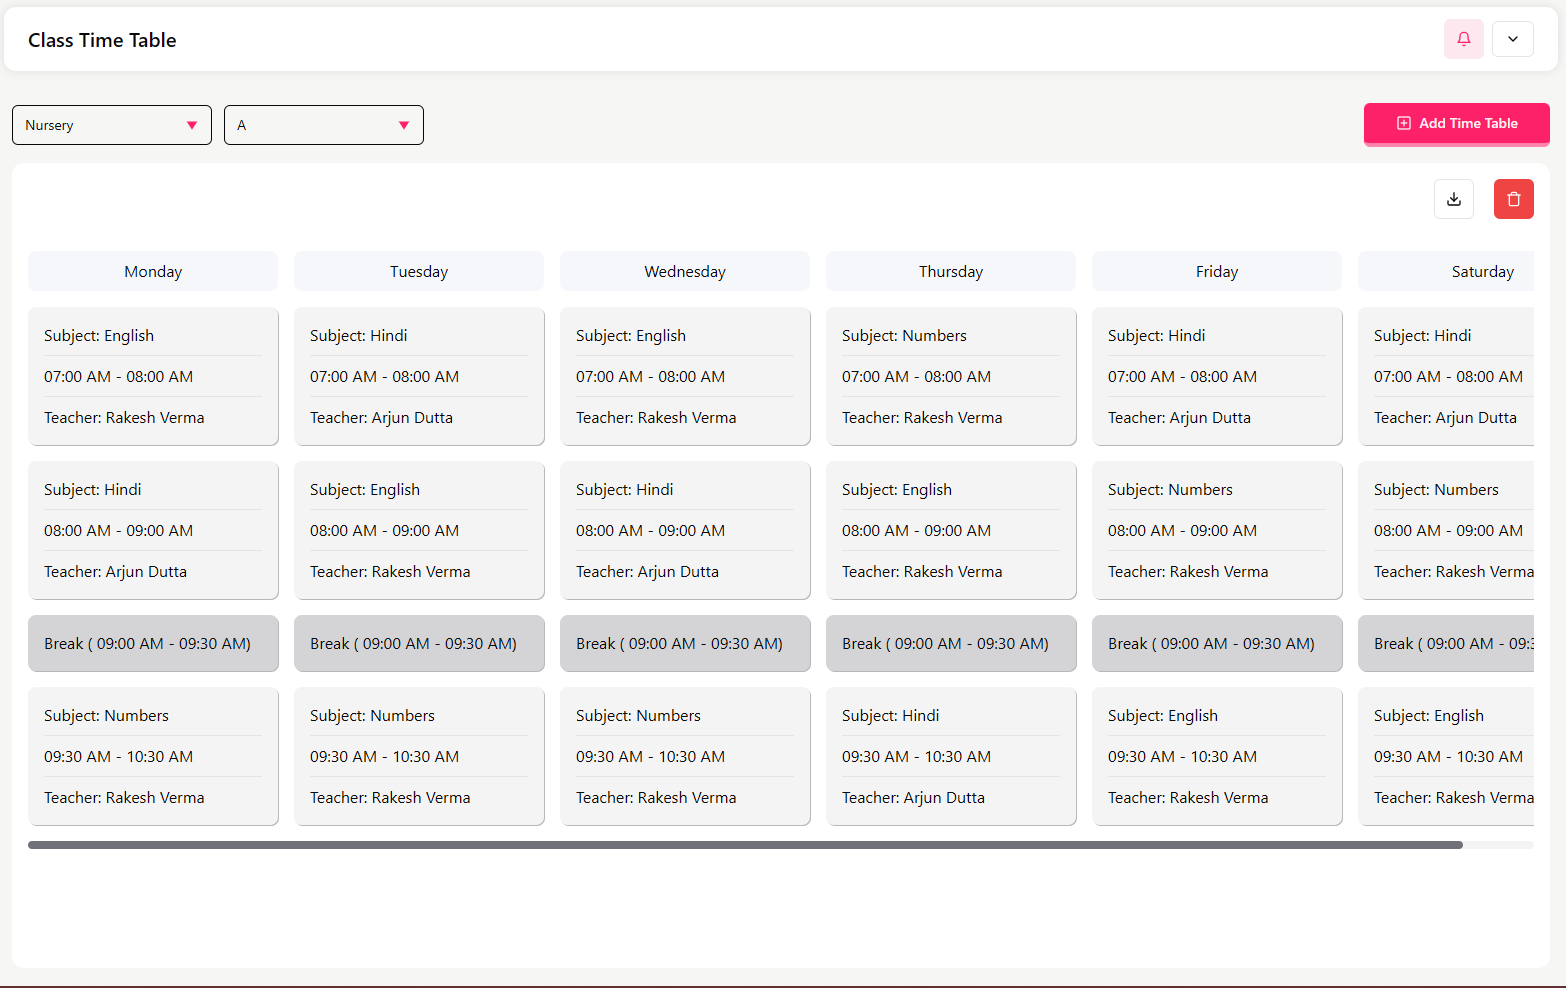
View Class Time Table
Select:
Class (e.g., Nursery)
Section (e.g., A)
You will see the complete weekly timetable from Monday to Saturday.
Each day shows:
Subject
Time slot (e.g., 07:00 AM – 08:00 AM)
Assigned teacher
Break time is clearly marked
Example entry:
Subject: English
Time: 07:00 AM – 08:00 AM
Teacher: Rakesh Verma
Add / Manage Time Table
Add / Manage Time Table (With the help of our AI feature) SSMS ai featrue help you to create automaticly setup you weekly timetable based on selected data and staff availability
Click Add Time Table to create or update the timetable.
You will go through the following steps:
Step 1 – Add New Time Table
Select Class
Select Section
Select School Shift
Set School Start and End Time
Set Period Duration
Set Break Duration
Set Break Start Time
Click Save & Next
Step 2 – Manage Timings
Define how many periods will be created based on time and duration.
Step 3 – Set Subjects
Assign subjects to each time slot.
Step 4 – Manage Teachers
Assign teachers to the subjects for each period.
The dropdown will display teachers assigned to the selected class and subject. If no specific teacher has been assigned to that class for the subject, all teachers associated with that subject will be shown as available options.
Step 5 – Finalize Time Table
Based on selected data, the AI generates a timetable for you for the whole week, and then you can also edit it as you want
Review the timetable and confirm.
Delete Time Table
You can remove an existing timetable using Delete Time Table.
💡
Important Notes
Subjects must be created in the Subjects module.
Teachers must be added to the Staff module.
This timetable directly updates the Staff Schedule automatically.
Results
The Results section allows the admin to:
View exam results class-wise and section-wise
Download result reports in PDF format
Publish results for students
Check grades, marks, and pass/fail status
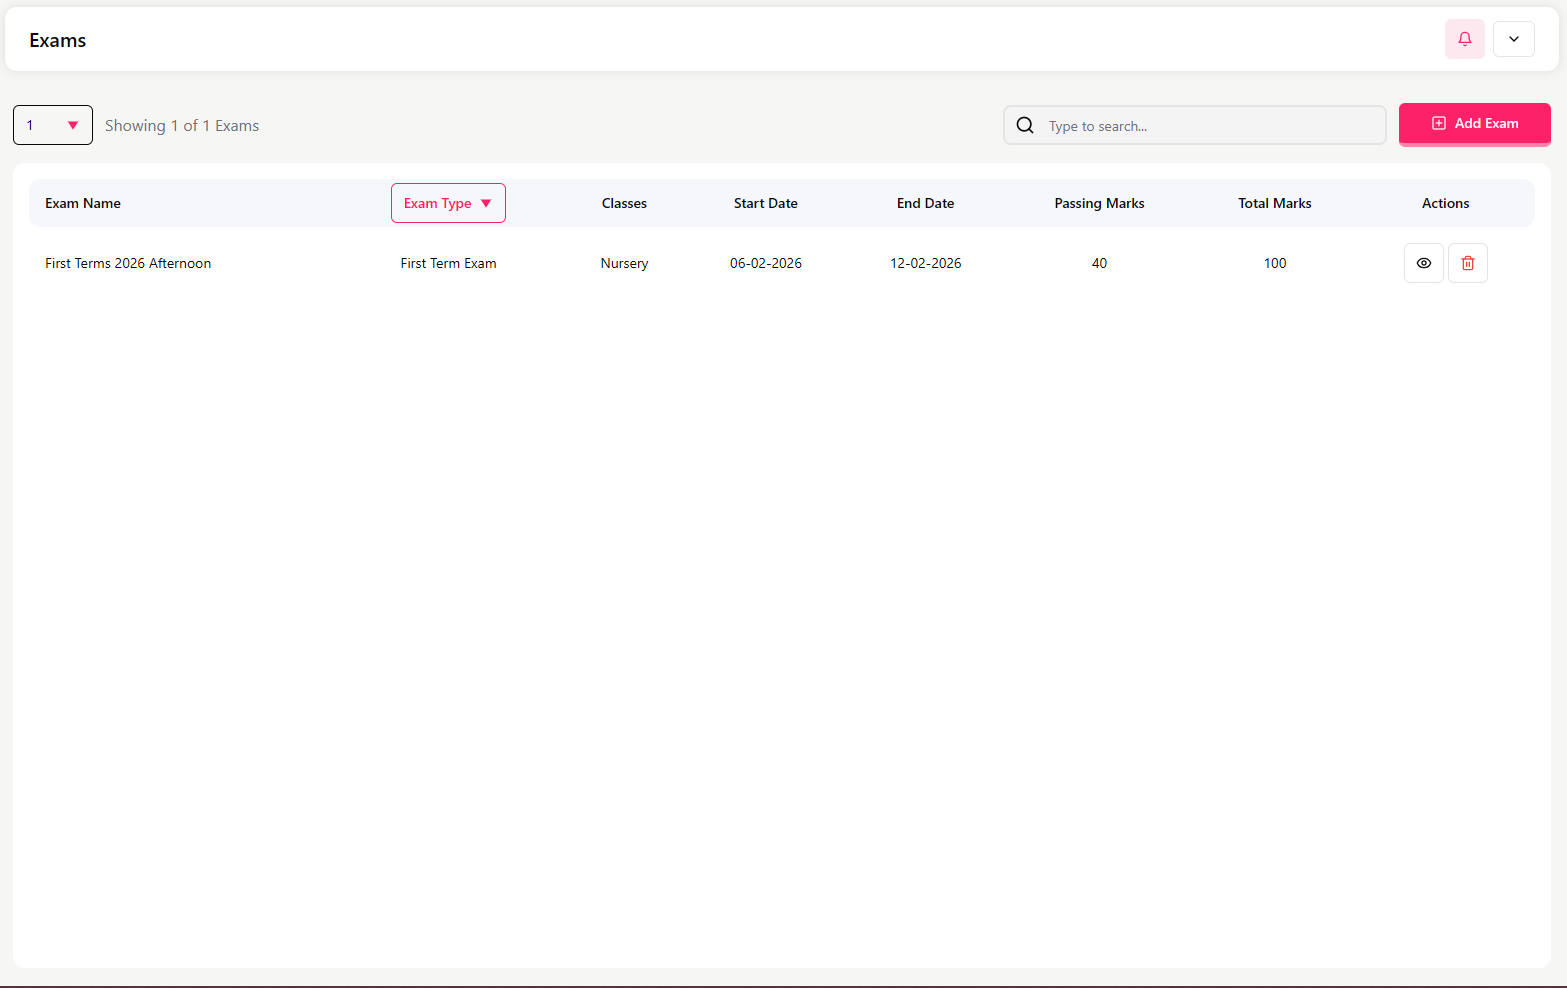
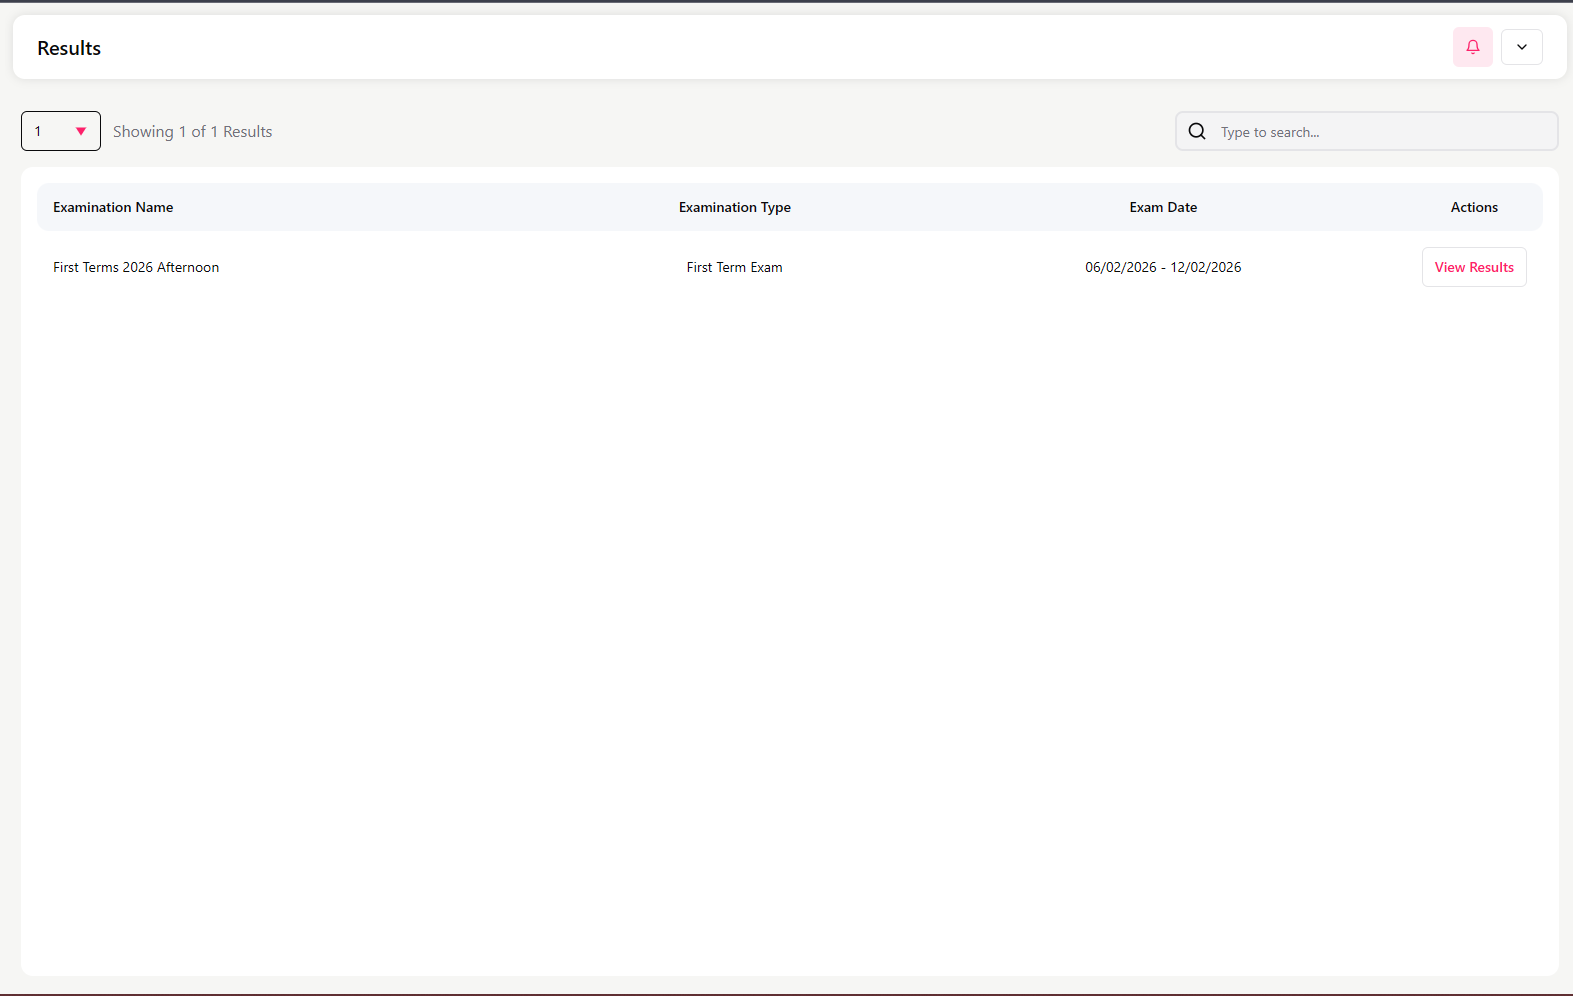
Results List Screen
This screen displays all published exam results with:
Examination Name
Examination Type
Exam Date Range
Action button (View Results)
Use the search bar to find a specific exam.
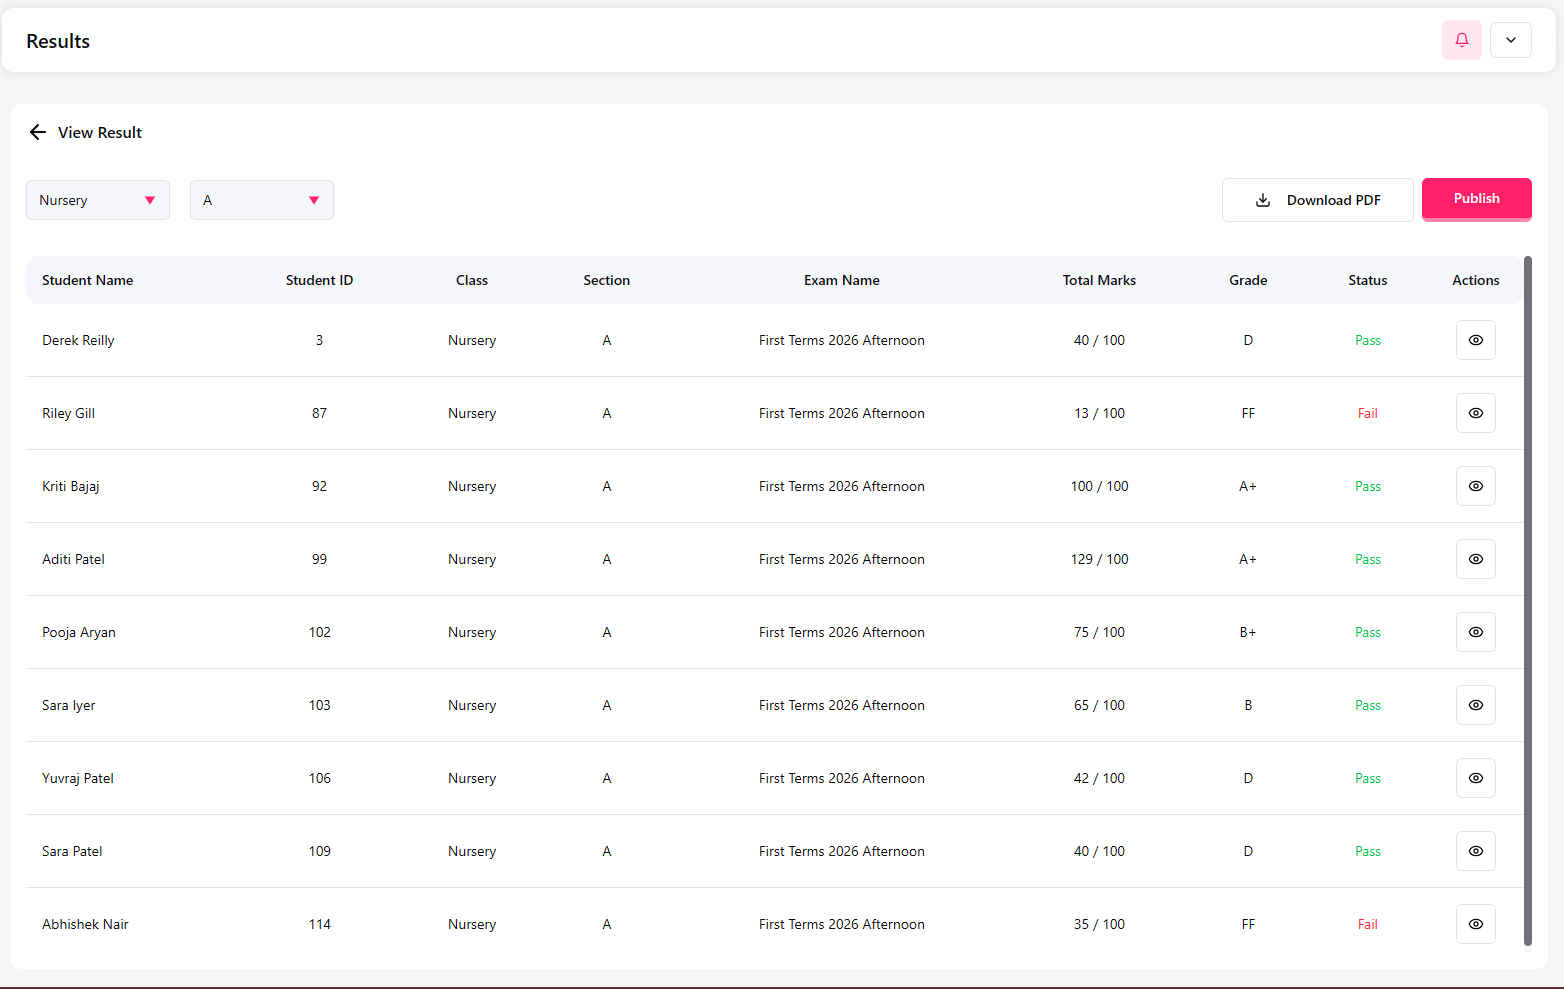
View Results
Click View Results to open the result page.
At the top, select:
Class (e.g., Nursery)
Section (e.g., A)
Buttons available:
Download PDF – Download results
Publish – Make results visible to students/parents
Results Table
The table shows:
Student Name
Student ID
Class
Section
Exam Name
Total Marks (e.g., 40 / 100)
Grade (A+, B, D, FF, etc.)
Status (Pass / Fail)
How to Use This Page
Review student performance
Download the result sheet for records
Publish results once verified
💡
Important Notes
Results are based on marks entered during the exam process.
Always verify marks before clicking Publish.
Grades and status are calculated automatically.
Class Test
The Class Test section allows the admin or teacher to:
Create and manage small tests (weekly, unit, monthly)
Define subject-wise tests for a class and section
View test details and download test reports
Class Test List Screen
At the top, select:
Class (e.g., Nursery)
Section (e.g., A)
The table displays:
Exam Name (e.g., Weekly Test, Unit Test, Monthly Exam)
Class
Section
Subject
Teacher
Exam Date
Total Marks
Action button (View)
Use the search bar to find a specific test.
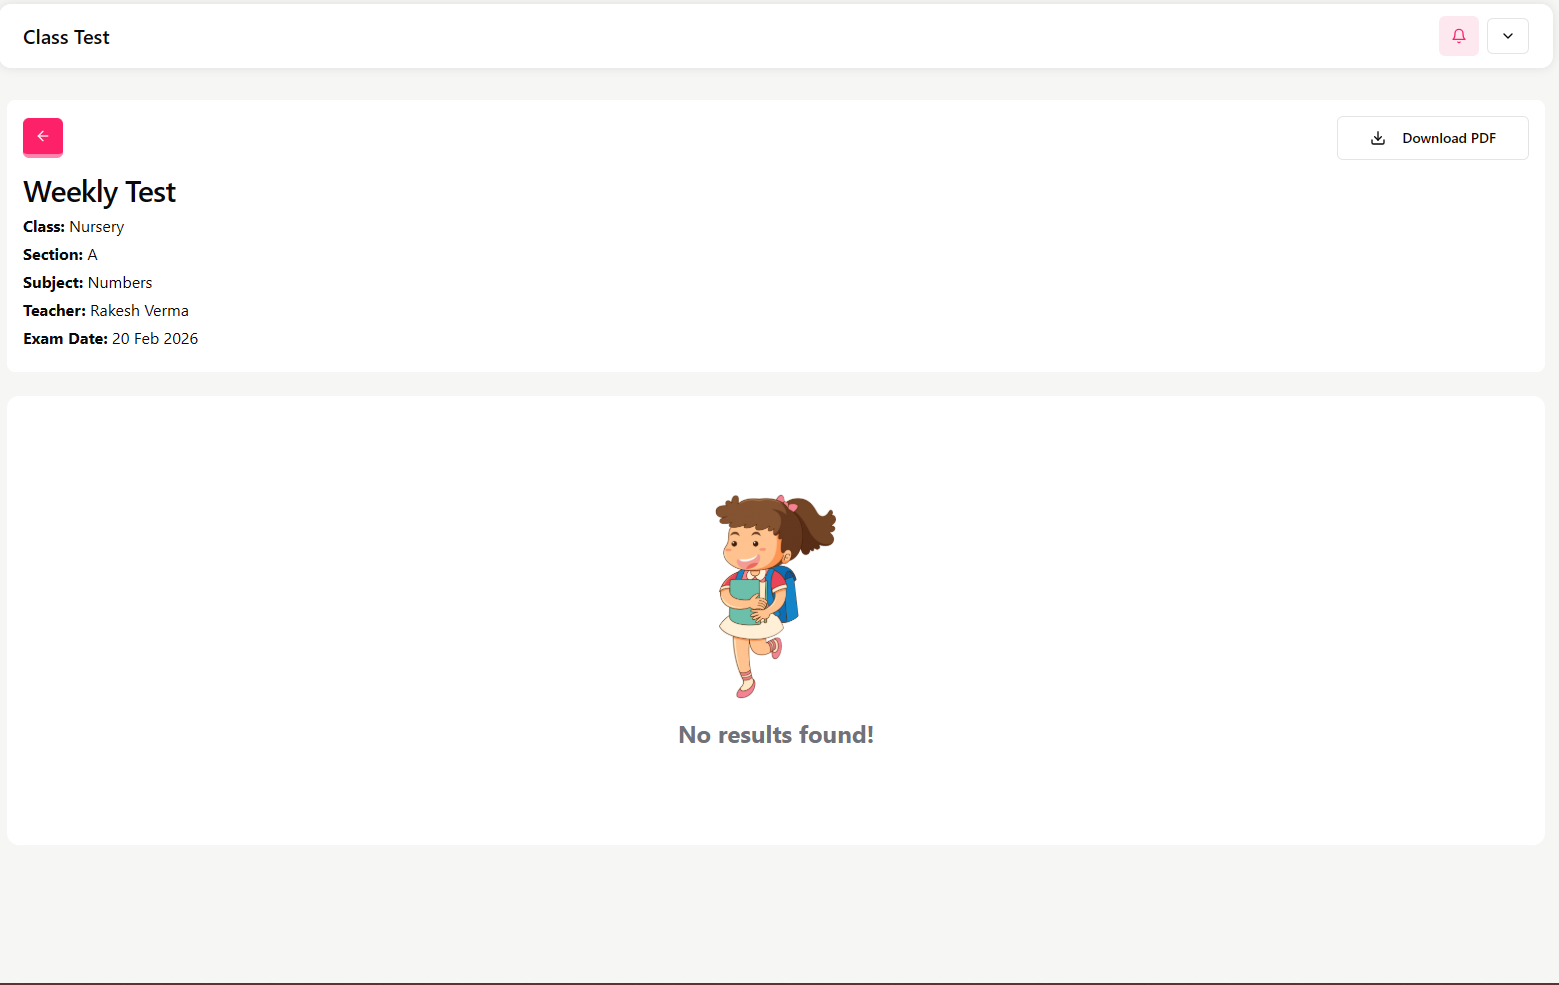
View Class Test Details
Click View to open the test details page.
This page shows:
Exam Name
Class and Section
Subject
Teacher
Exam Date
Description of the test
Buttons available:
Download PDF
If no marks are entered yet, the system may display No results found.
Important Notes
Class Tests are smaller assessments compared to full exams.
Results appear here only after marks are entered.
Useful for tracking regular student performance.
Payroll
The Payroll section allows the admin to:
Calculate staff salary based on attendance
Issue the monthly salary
Apply bonuses and deductions
Maintain payroll history records
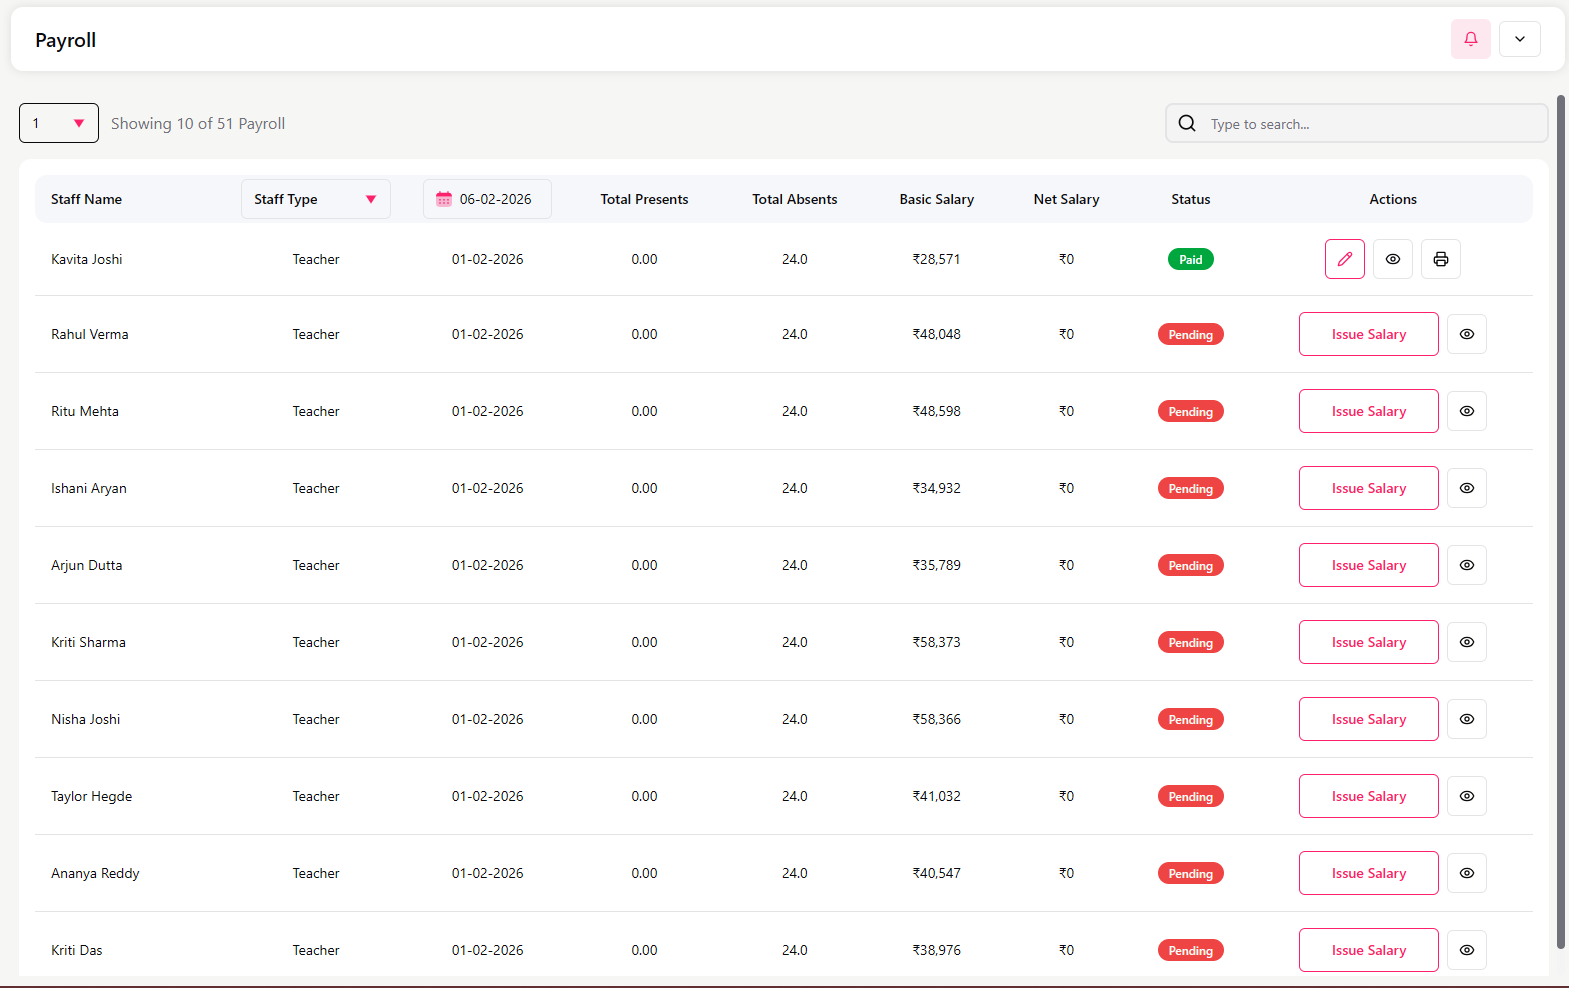
Payroll List Screen
The system generates the payroll for staff at the end of every month according to the staff's attendance
This screen displays payroll details for all staff for the selected month.
You can see:
Staff Name
Staff Type (Teacher, Accountant, etc.)
Salary Month
Total Presents
Total Absents
Basic Salary
Net Salary
Status (Paid / Pending)
Issue Salary action button (for pending)
Use the search bar and date filter to find records.
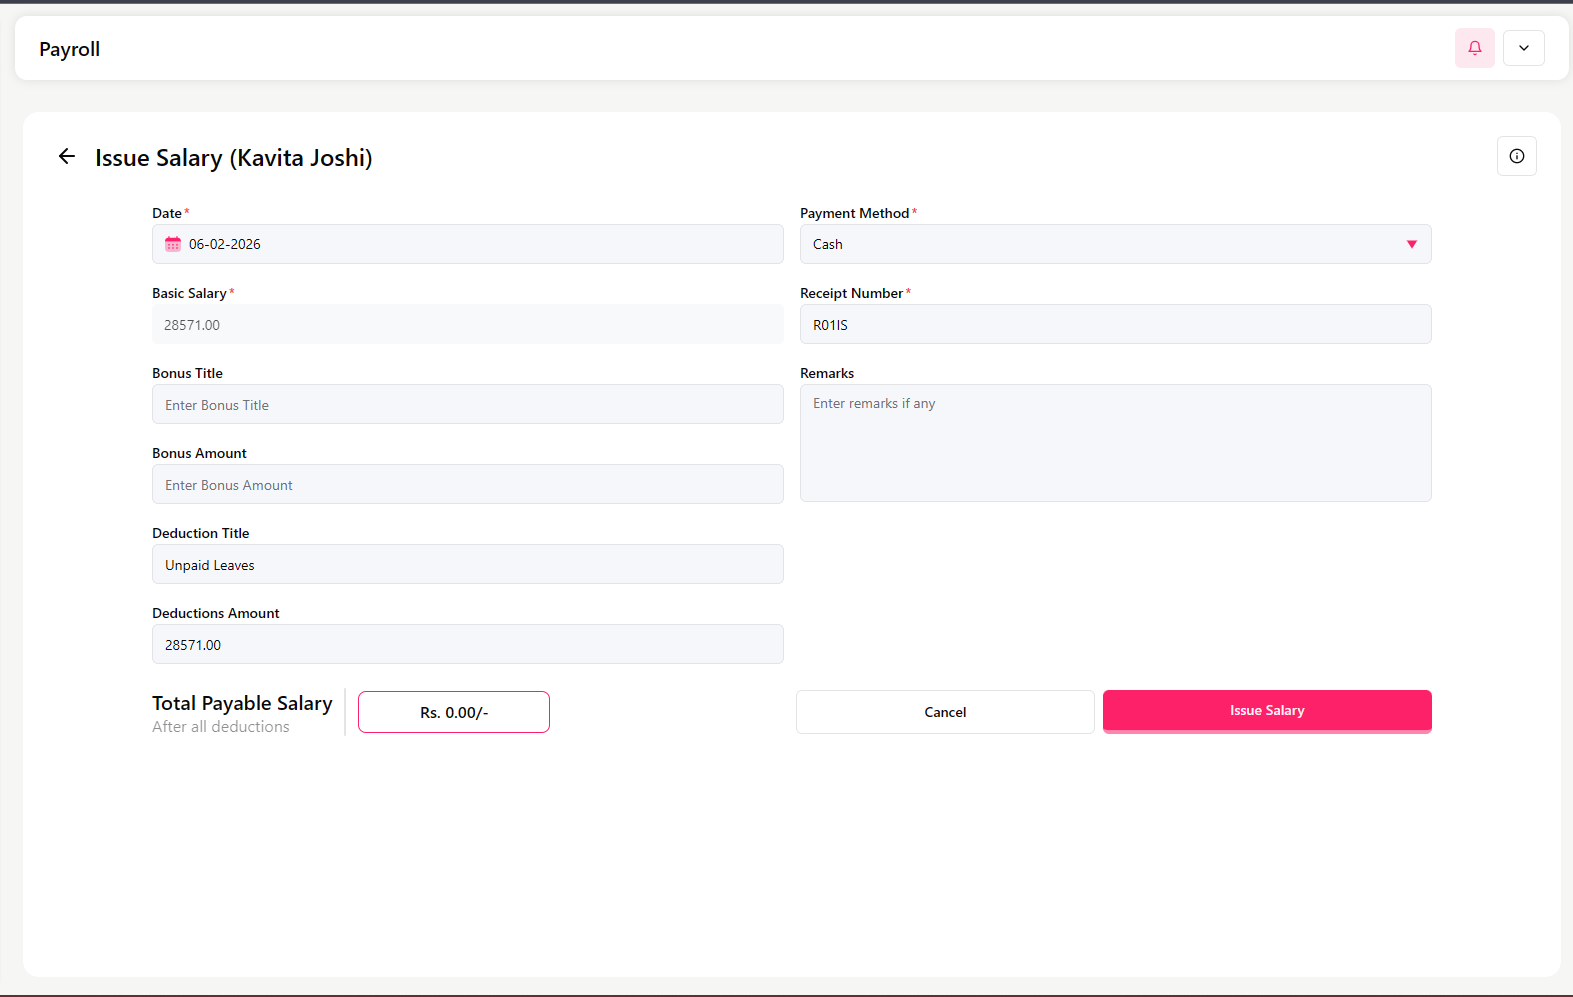
Issue Salary
Click Issue Salary for a staff member with pending status.
Fill in the following details:
Date of payment
Basic Salary (auto-filled)
Bonus Title and Bonus Amount (if any)
Deduction Title (e.g., Unpaid Leaves)
Deduction Amount
Payment Method and payment required details
Receipt Number
Remarks
The system automatically calculates:
Total Payable Salary after deductions and bonuses
Click Issue Salary to confirm payment.
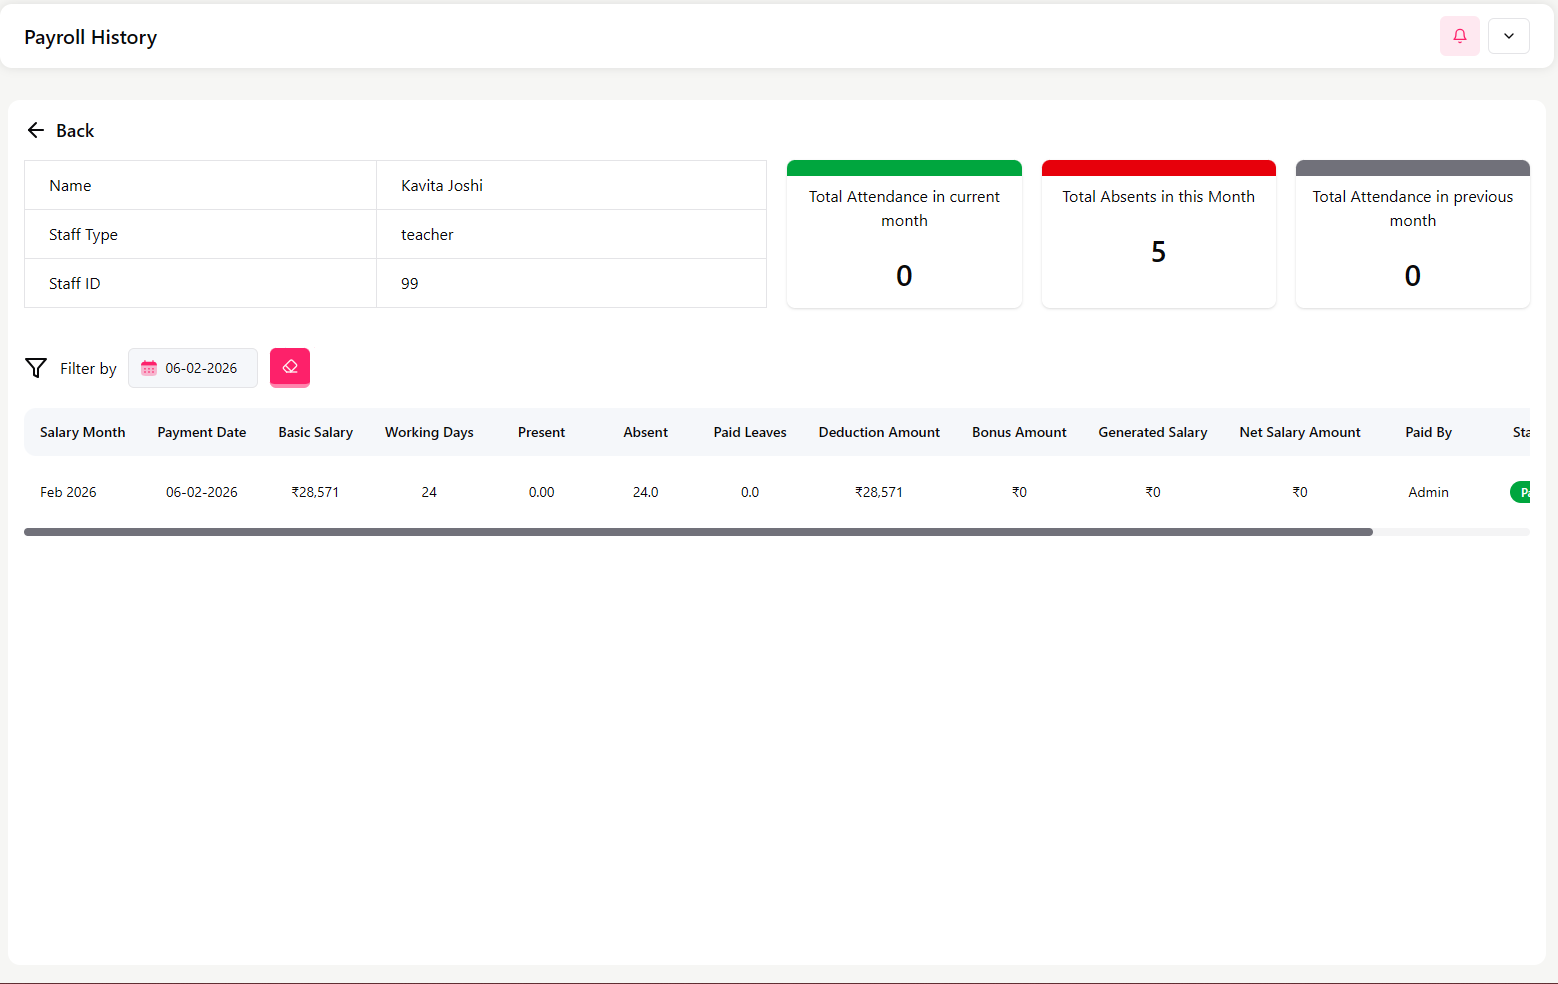
Payroll History
Click on a staff record to view detailed payroll history.
This page shows:
Staff Name, Type, and ID
Attendance summary (current and previous month)
Salary records month-wise
Table includes:
Salary Month
Payment Date
Basic Salary
Working Days
Presents / Absents / Paid Leaves
Deduction Amount
Bonus Amount
Generated Salary
Net Salary Amount
Paid By
Status
Important Notes
Payroll is directly dependent on Staff Attendance.
Always verify attendance before issuing salary.
Receipt number helps track salary transactions.
Gate Pass Management
The Gate Pass section allows the admin to:
Create gate passes for students, staff, and visitors
Record exit details with reason and receiver information
Maintain security and movement records
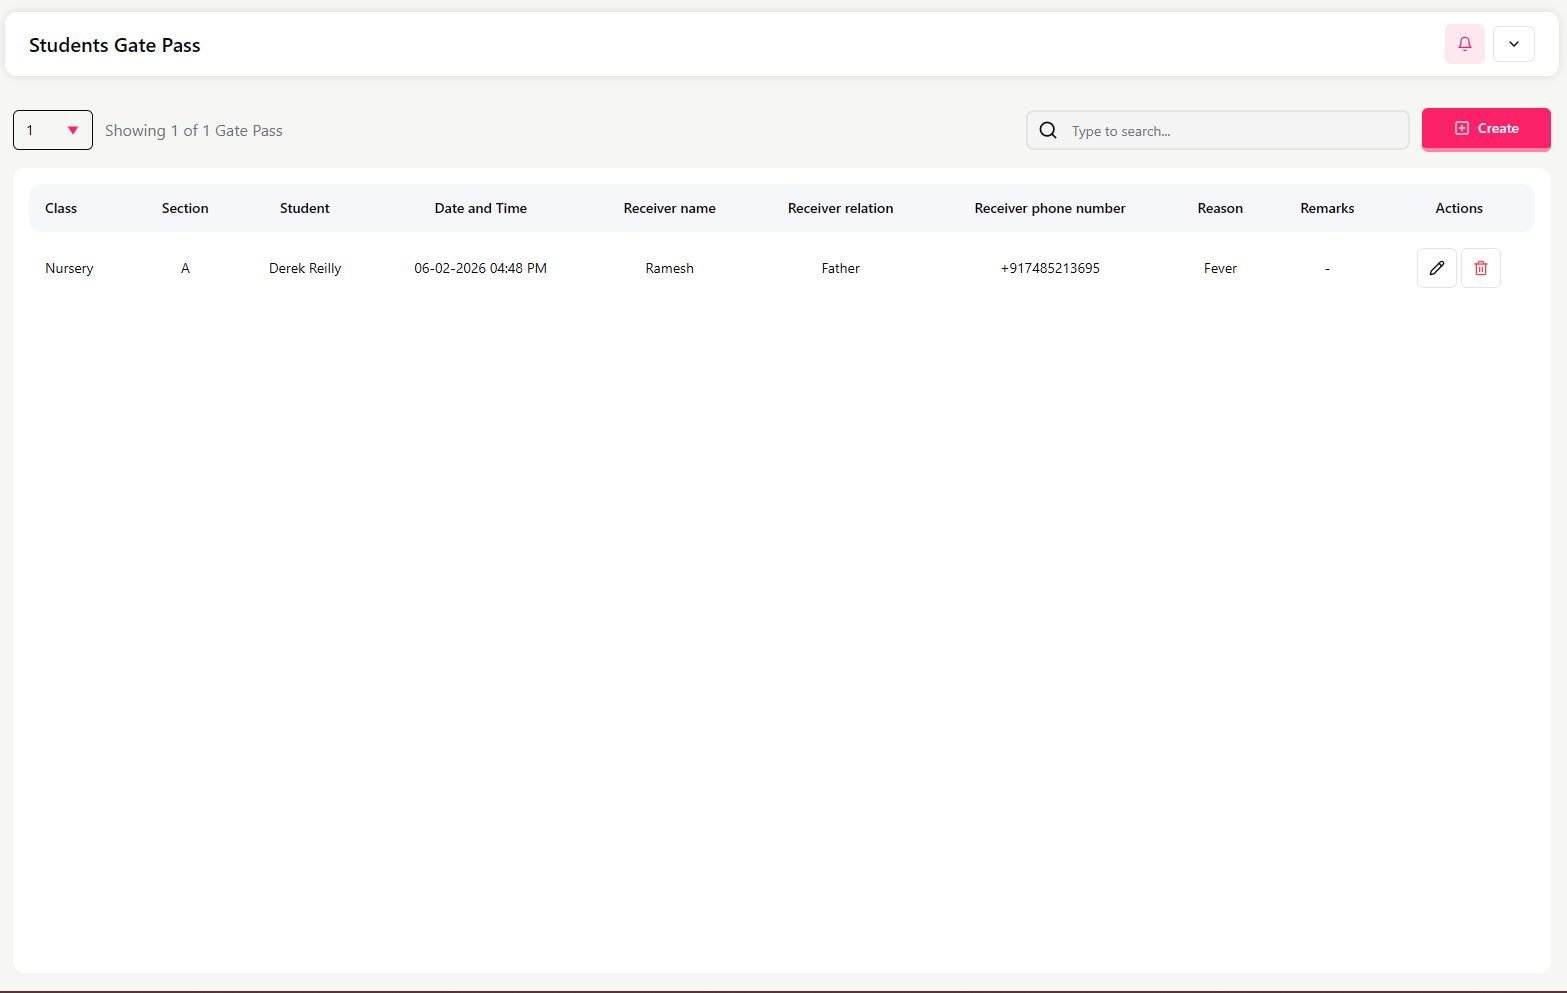
Student Gate Pass
Student Gate Pass List
This screen shows all created gate passes for students with:
Class
Section
Student Name
Date and Time
Receiver Name
Receiver Relation
Receiver Phone Number
Reason
Remarks
Actions
Click Create to generate a new gate pass.
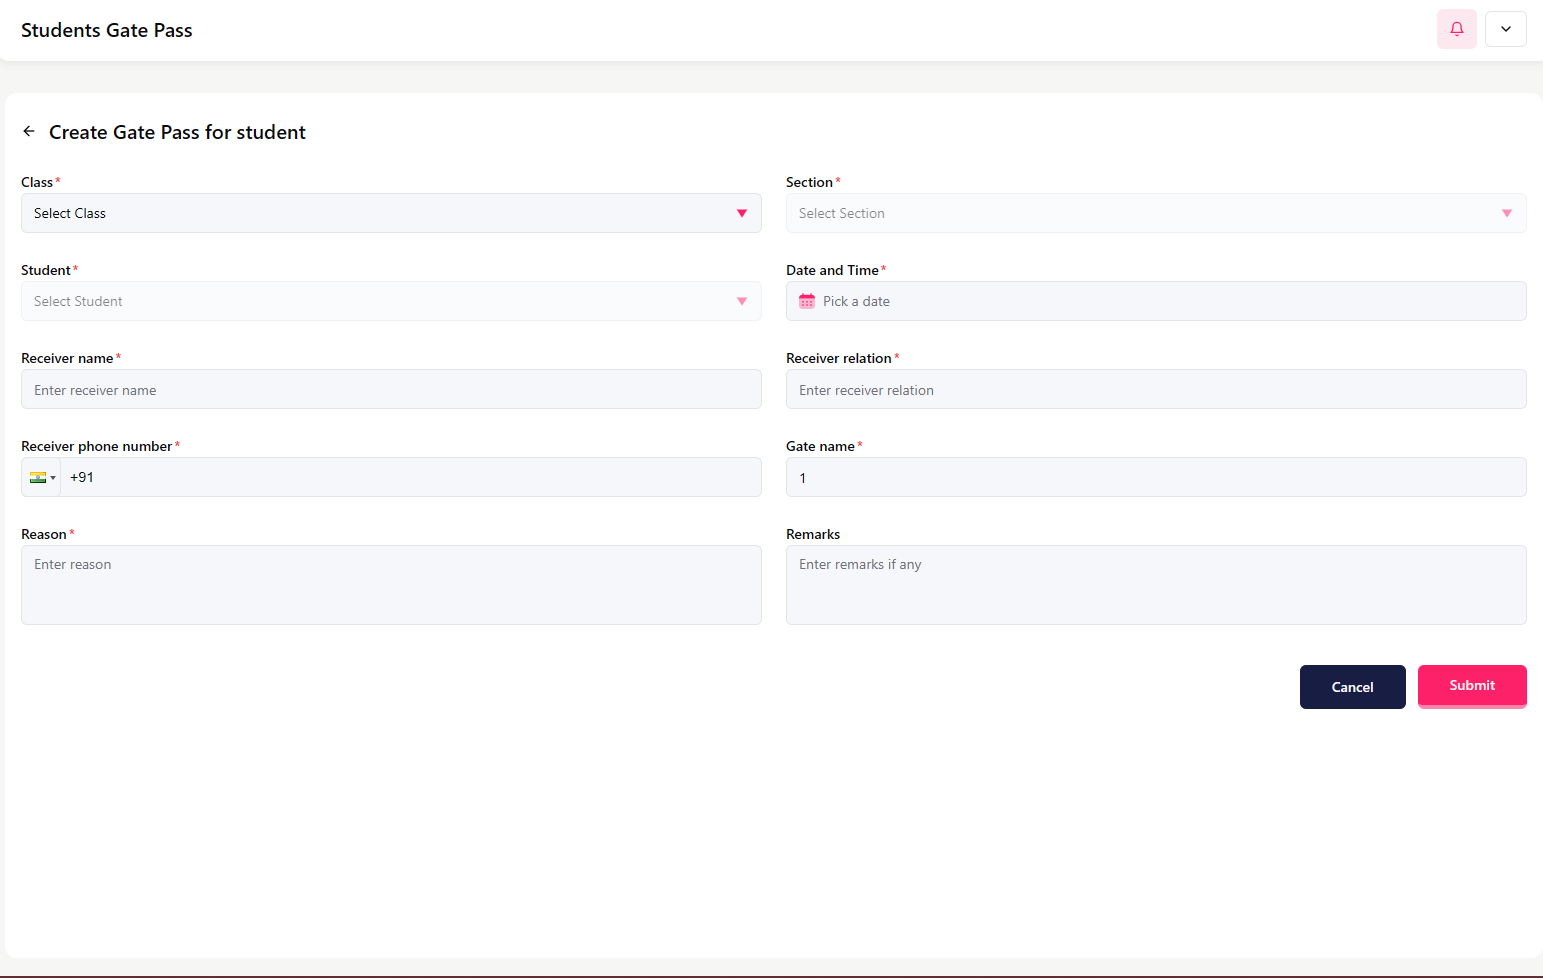
Create Gate Pass for Student
Fill in the following details:
Class
Section
Student
Date and Time
Receiver Name
Receiver Relation (e.g., Father, Mother)
Receiver Phone Number
Gate Name
Reason (e.g., Fever, Personal Work)
Remarks (optional)
Click Submit.
Staff Gate Pass
Staff Gate Pass List
Displays gate passes created for staff members.
Click Create to add a new staff gate pass.
Create Gate Pass for Staff
Enter:
Staff Name
Date and Time
Reason
Click Submit.
Visitors Gate Pass
Visitors Gate Pass List
Displays visitor entry and exit records with:
Visitor Name
Mobile Number
Vehicle Number
Check-in Time
Check-out Time
Status
Purpose
Click Create to add a visitor record.
Create Gate Pass for Visitor
Enter:
Visitor Name
Visitor Mobile
Vehicle Number
Gate Name
Check-in Time
Check-out Time
Status (Checked-in / Checked-out)
Purpose
Click Submit.
Important Notes
Gate passes help maintain campus security.
Always ensure the receiver or visitor details are accurate.
Records can be used for tracking student and visitor movement.
When to Use This Module
Use the Gate Pass module when:
A student leaves school during school hours
Staff exits campus for official reasons
Visitors enter or leave the school premises
Events
The Events section allows the admin to:
Create and manage school events
Define event date, time, and description
Upload banners, images, and videos
Publish events so they are visible to users
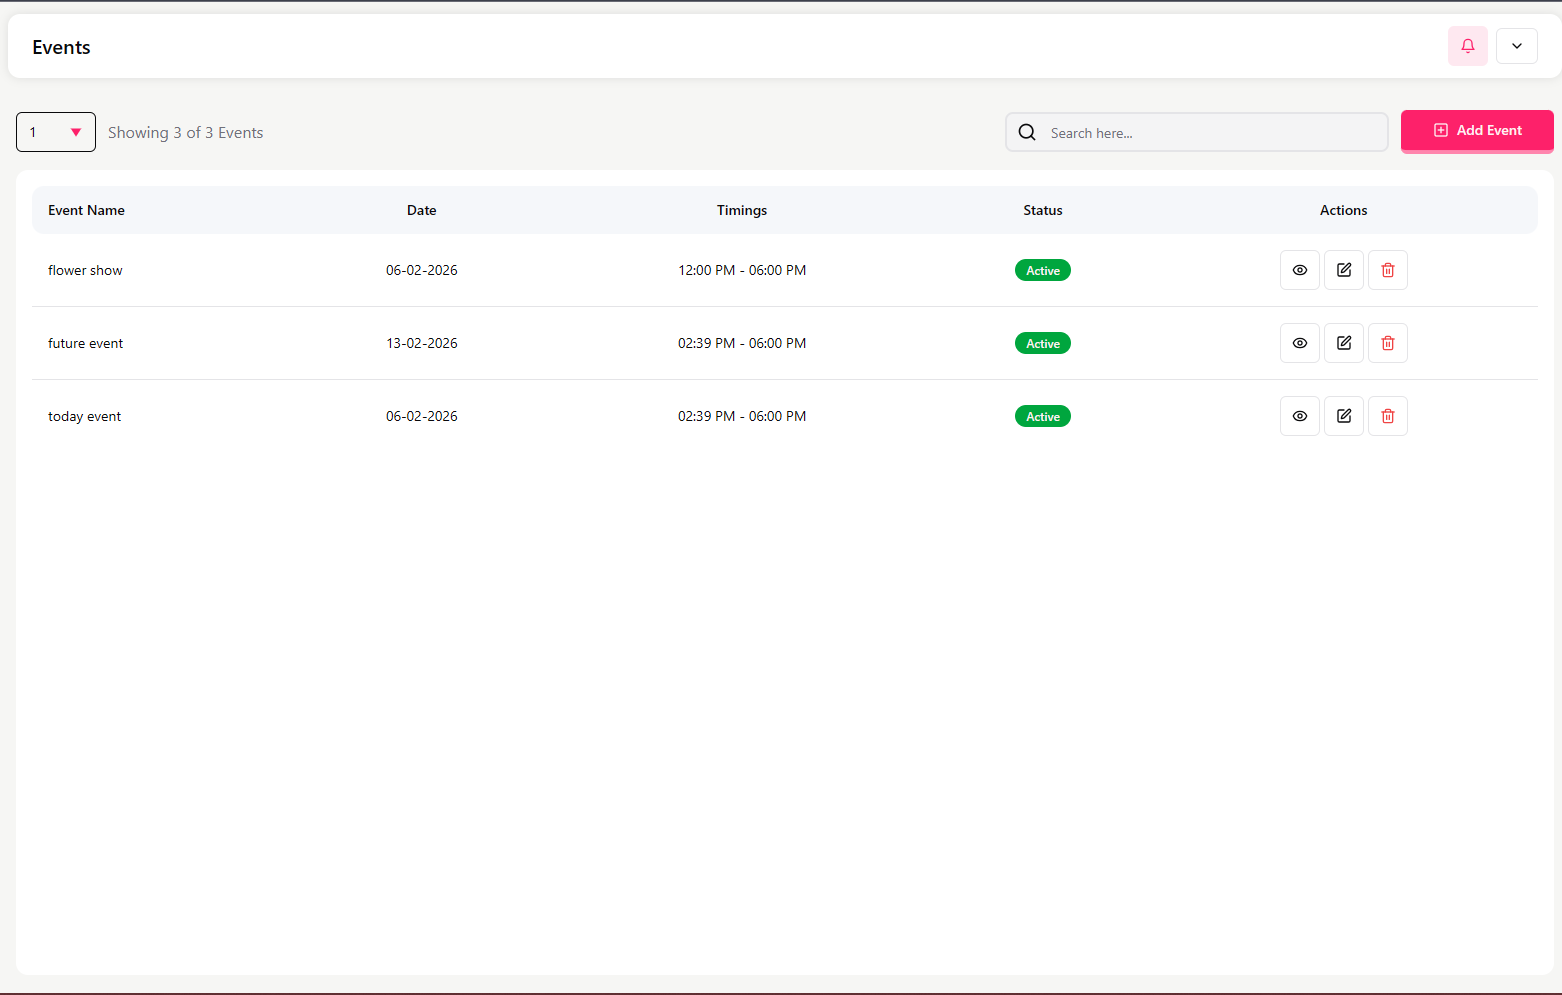
Events List Screen
This screen displays all created events with:
Event Name
Date
Timings
Status (Active / Inactive)
Action buttons (View / Edit)
Use the search bar to find an event.
Click Add Event to create a new event.
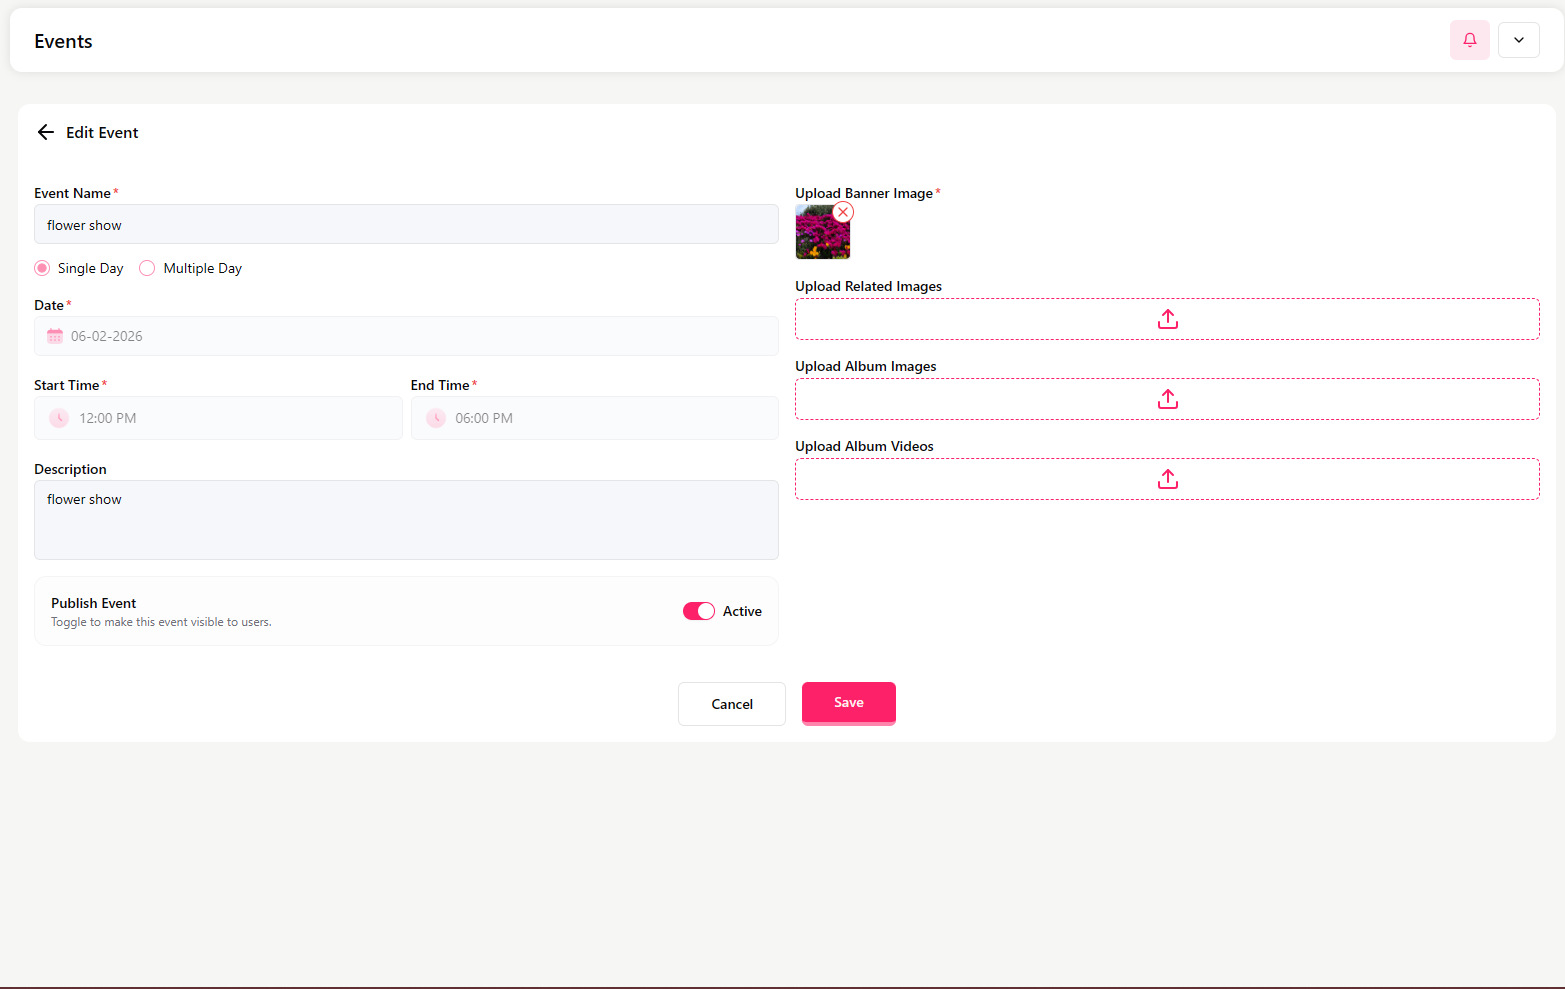
Add / Edit Event
While creating or editing an event, fill in:
Event Name
Choose Single Day or Multiple Day
Date
Start Time and End Time
Description
Publish Event
Use the toggle to make the event visible to users.
Media Upload Options
You can upload:
Banner Image
Related Images
Album Images
Album Videos
Click Save after entering details.
View Event
Click View to see event details as users will see them.
This shows:
Event Name
Event Date
Event Timings
Description
Important Notes
Only published events are visible to users.
Adding images and videos makes the event more informative.
Use clear descriptions for better communication.
Notice
The Notice section allows the admin to:
Create and publish important announcements
Send notices to specific recipients (staff, teachers, students)
Categorize notices by type (important, exam, fee, emergency, general)
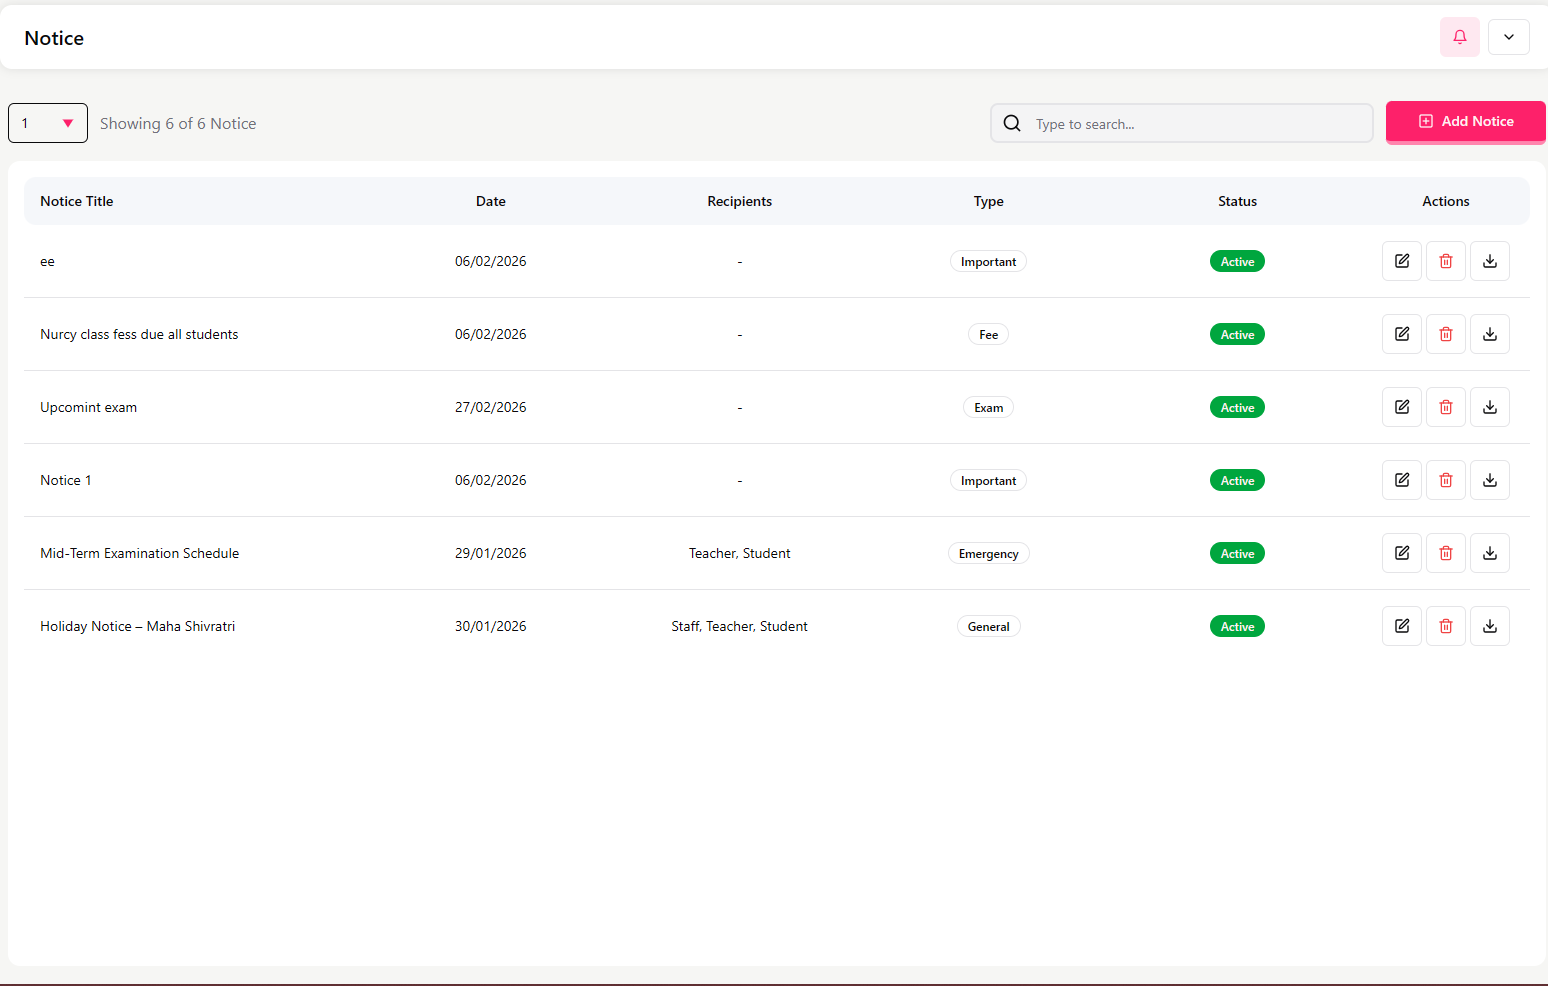
Notice List Screen
This screen displays all notices with:
Notice Title
Date
Recipients
Type
Status (Active / Inactive)
Action buttons (Edit / View)
Use the search bar to find a notice.
Click Add Notice to create a new one.
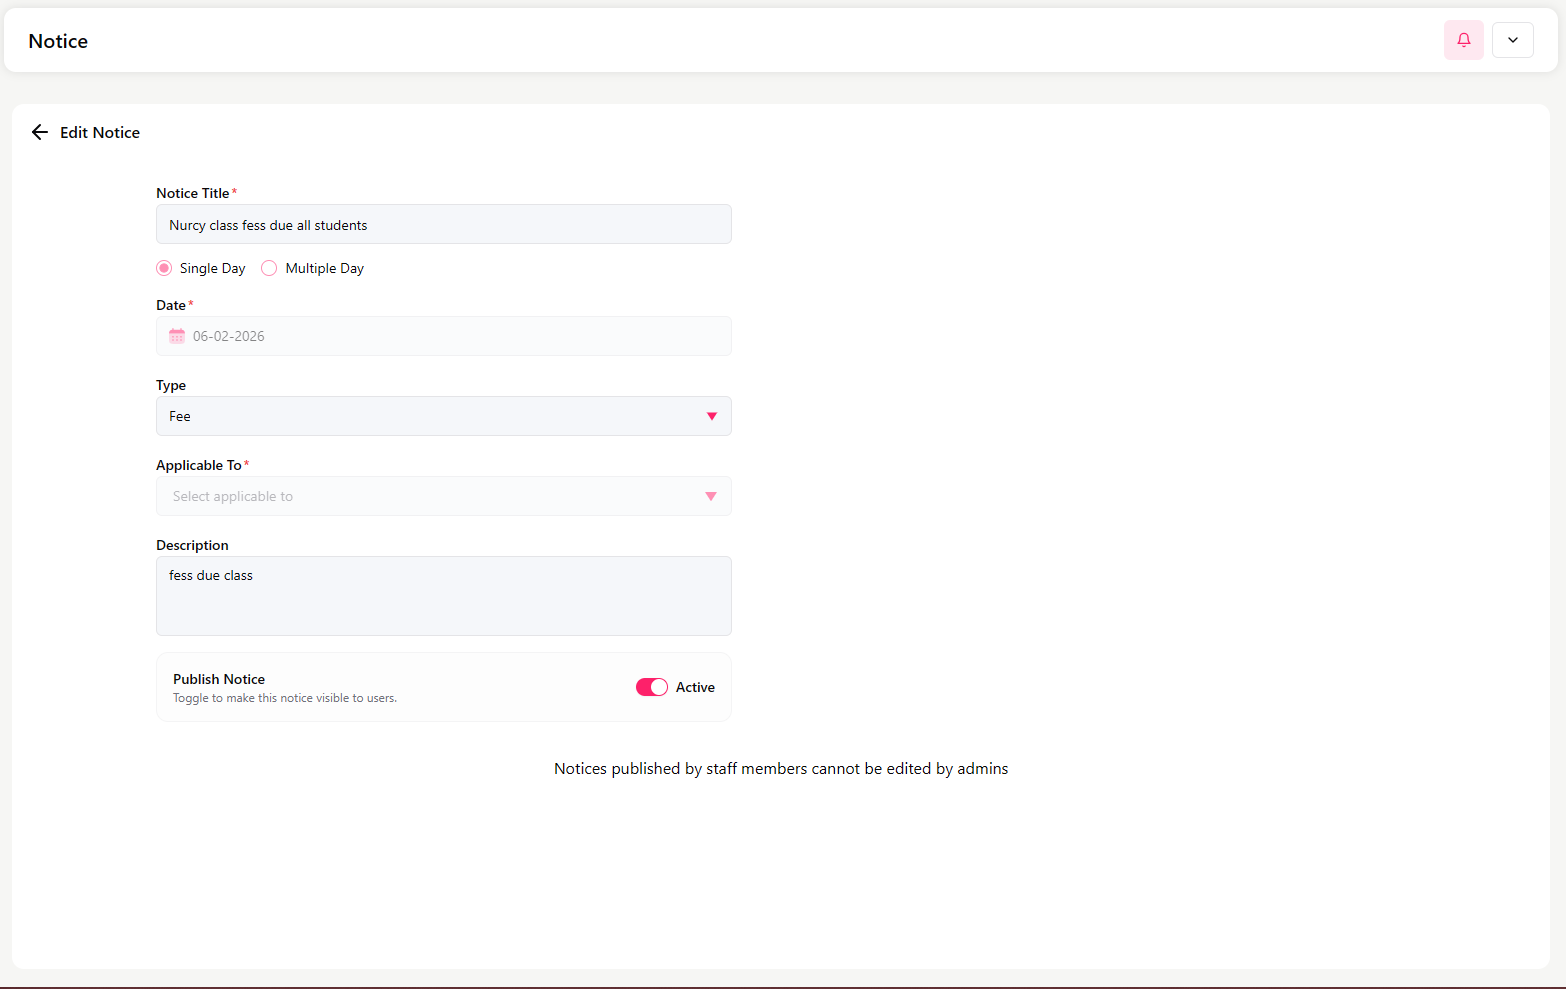
Add / Edit Notice
While creating or editing a notice, fill in:
Notice Title
Choose Single Day or Multiple Day
Date
Type (Important, Exam, Fee, Emergency, General)
Applicable To (Staff, Teacher, Student)
This option defines who will receive the notice.
Students
Send notices to multiple classes at once.
You can target:
All students
Specific classes
Specific sections
A particular student, by selecting:
Student → Class → Section → Student
Staff
Send notices to all staff members in Bulk.
Teachers
Send notices to all teachers in Bulk.
All Types
You can also select Staff, Teacher, and Student together to send a notice to everyone at once.
Publish Notice
Use the toggle to make the notice visible to users.
Click Save after entering details.
Important Notes
Notices published by staff members cannot be edited by admins.
Only published notices are visible to users.
Select the correct recipients to ensure proper communication.
Alumni
The Alumni section allows the admin to:
View records of students who have left the school
Maintain historical student data
Track leaving certificate details and reasons for leaving
Alumni List Screen
This screen displays former students with:
Date of leaving
Student Name
GR Number
Leaving Certificate Number
Type (e.g., Transfer, Completed, Terminated)
Reason for leaving
Action buttons (View)
You can use:
Search bar to find a student
Date filter to filter records by date
If no students have been moved to alumni, the list will show No results found.
How Students Appear in Alumni
Students are moved to Alumni when:
A student is terminated from the Student Profile
A leaving certificate is issued
The student completes schooling and exits the system
Expense Head
The Expense Head section allows the admin to:
Create categories for different types of school expenses
Organize and track expenses under proper headings
Monitor total spending by category
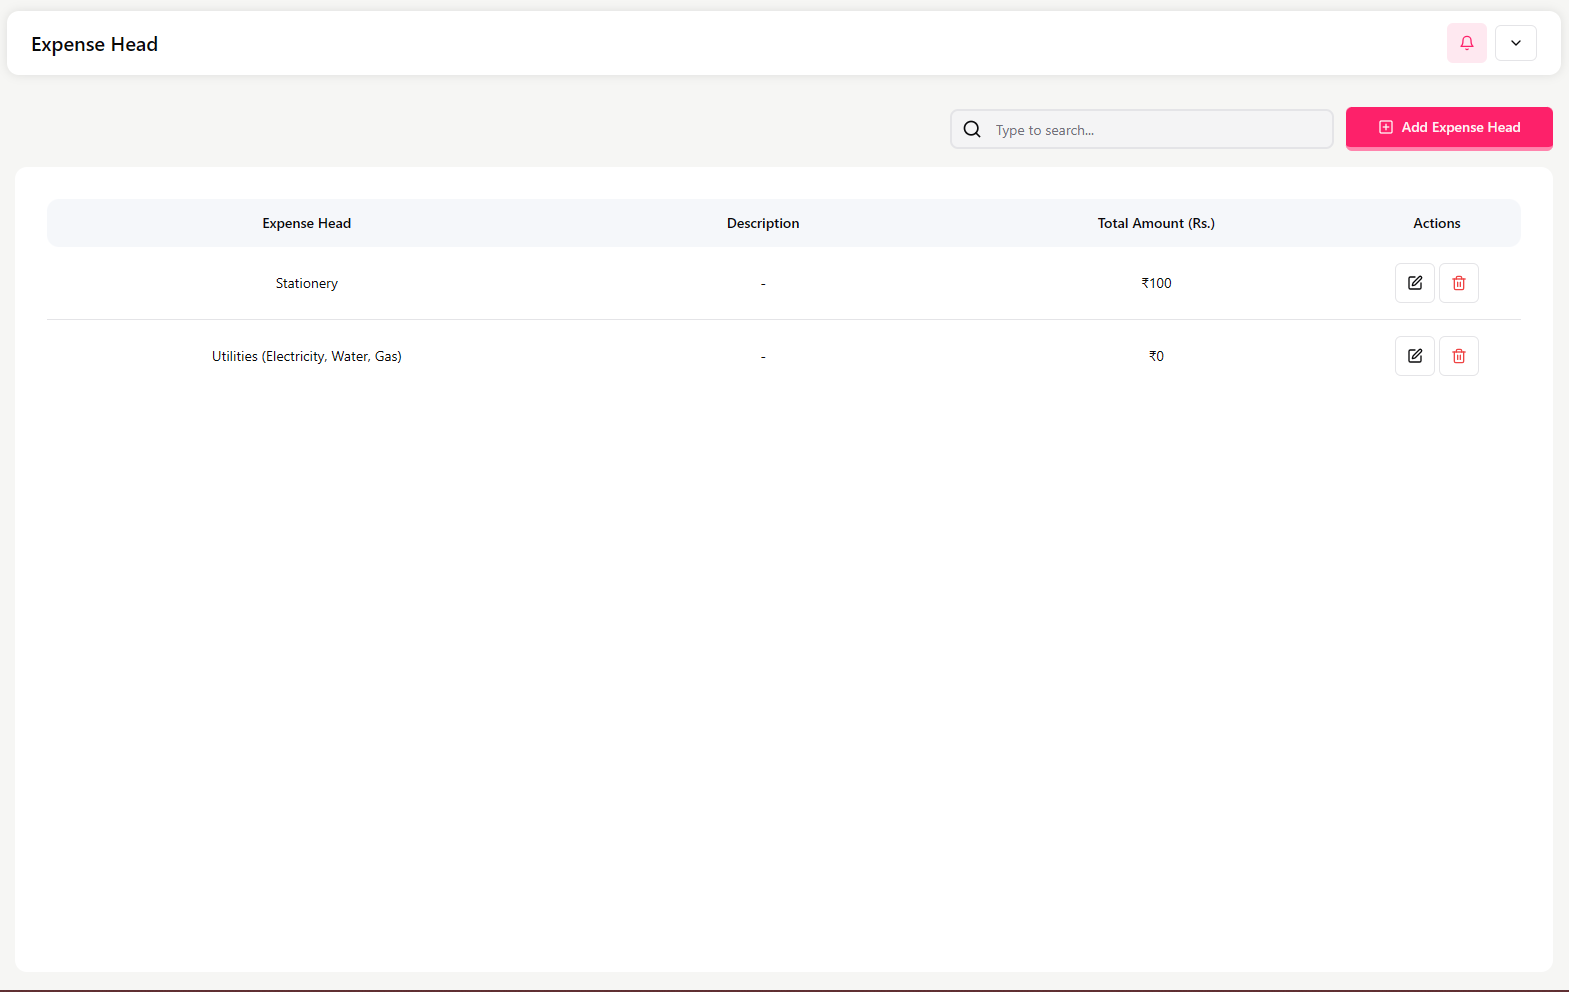
Expense Head List Screen
This screen displays all expense categories with:
Expense Head name (e.g., Stationery, Utilities)
Description
Total Amount spent under that head
Action button (Edit)
Use the search bar to find an expense head.
Click Add Expense Head to create a new category.
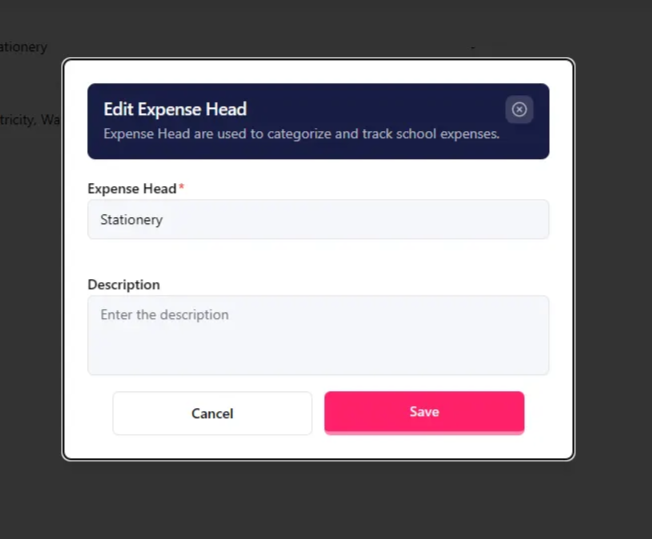
Add / Edit Expense Head
When creating or editing an expense head, enter:
Expense Head Name (e.g., Stationery, Electricity, Maintenance)
Description (optional explanation)
Click Save.
Important Notes
Expense Heads are used while adding expenses in the Expense List.
Proper categorization helps in financial tracking and reporting.
When to Use This Module
Use the Expense Head module when:
Setting up expense categories
Organizing school expense tracking
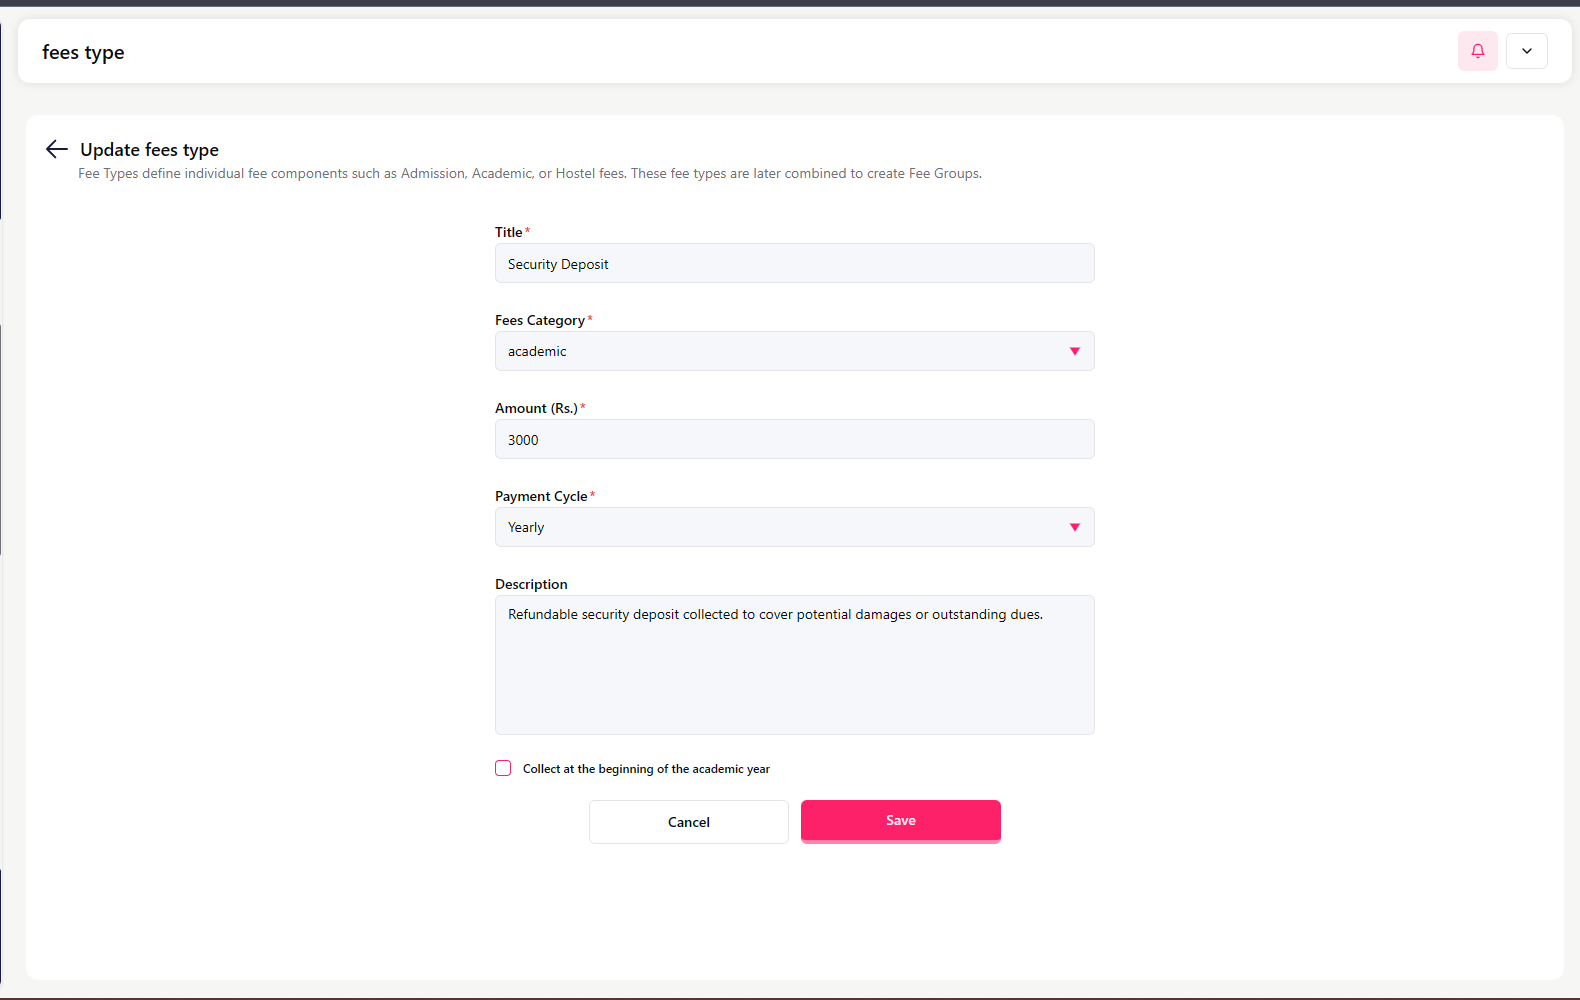
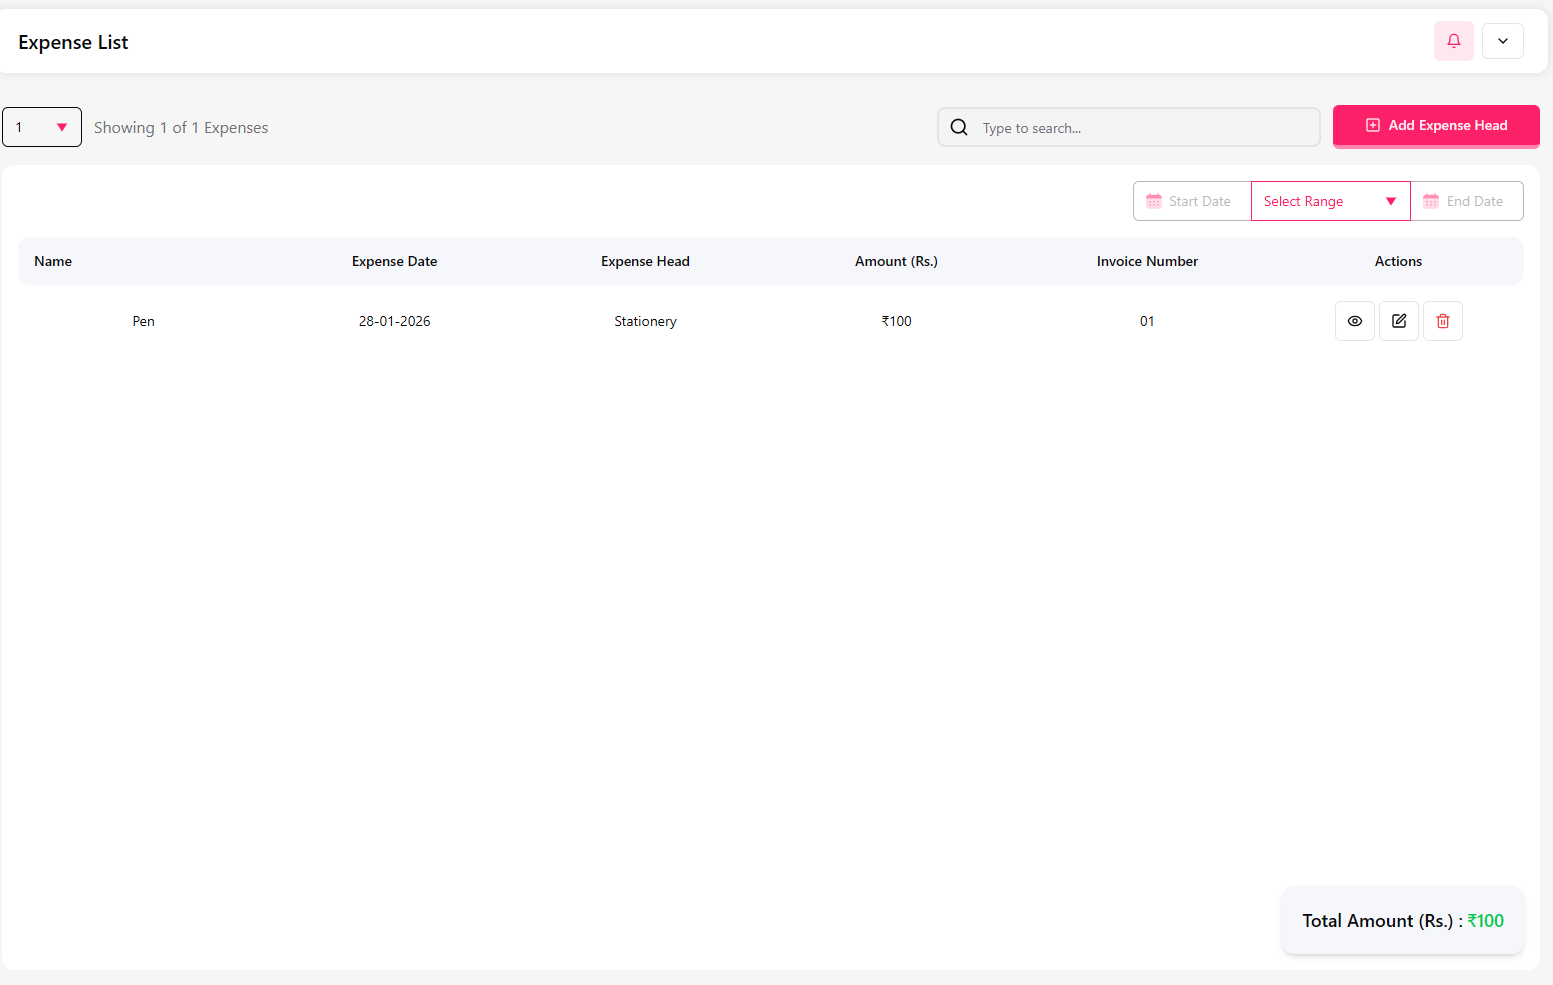
Add / Edit Expense
When adding or editing an expense, fill in the following details:
Expense Head (e.g., Stationery, Utilities)
This comes from the Expense Head module
Name (e.g., Pen, Electricity Bill, Maintenance)
Invoice Number
Date of Expense
Amount (Rs.)
Attach Document (invoice or proof, if available)
Description (optional notes)
Click Update (or Save) to record the expense.
Important Notes
Every expense must be linked to an Expense Head.
Attaching the invoice helps in record keeping and audits.
The total amount will be reflected under the respective Expense Head.
When to Use This Module
Use the Expense List module when:
Recording daily or monthly school expenses
Tracking spending with proper documentation
Role Management
The Role Management section allows the admin to:
Create different user roles (e.g., Teacher, Accountant, Principal)
Control what each role can access in the system
Manage permissions for system modules
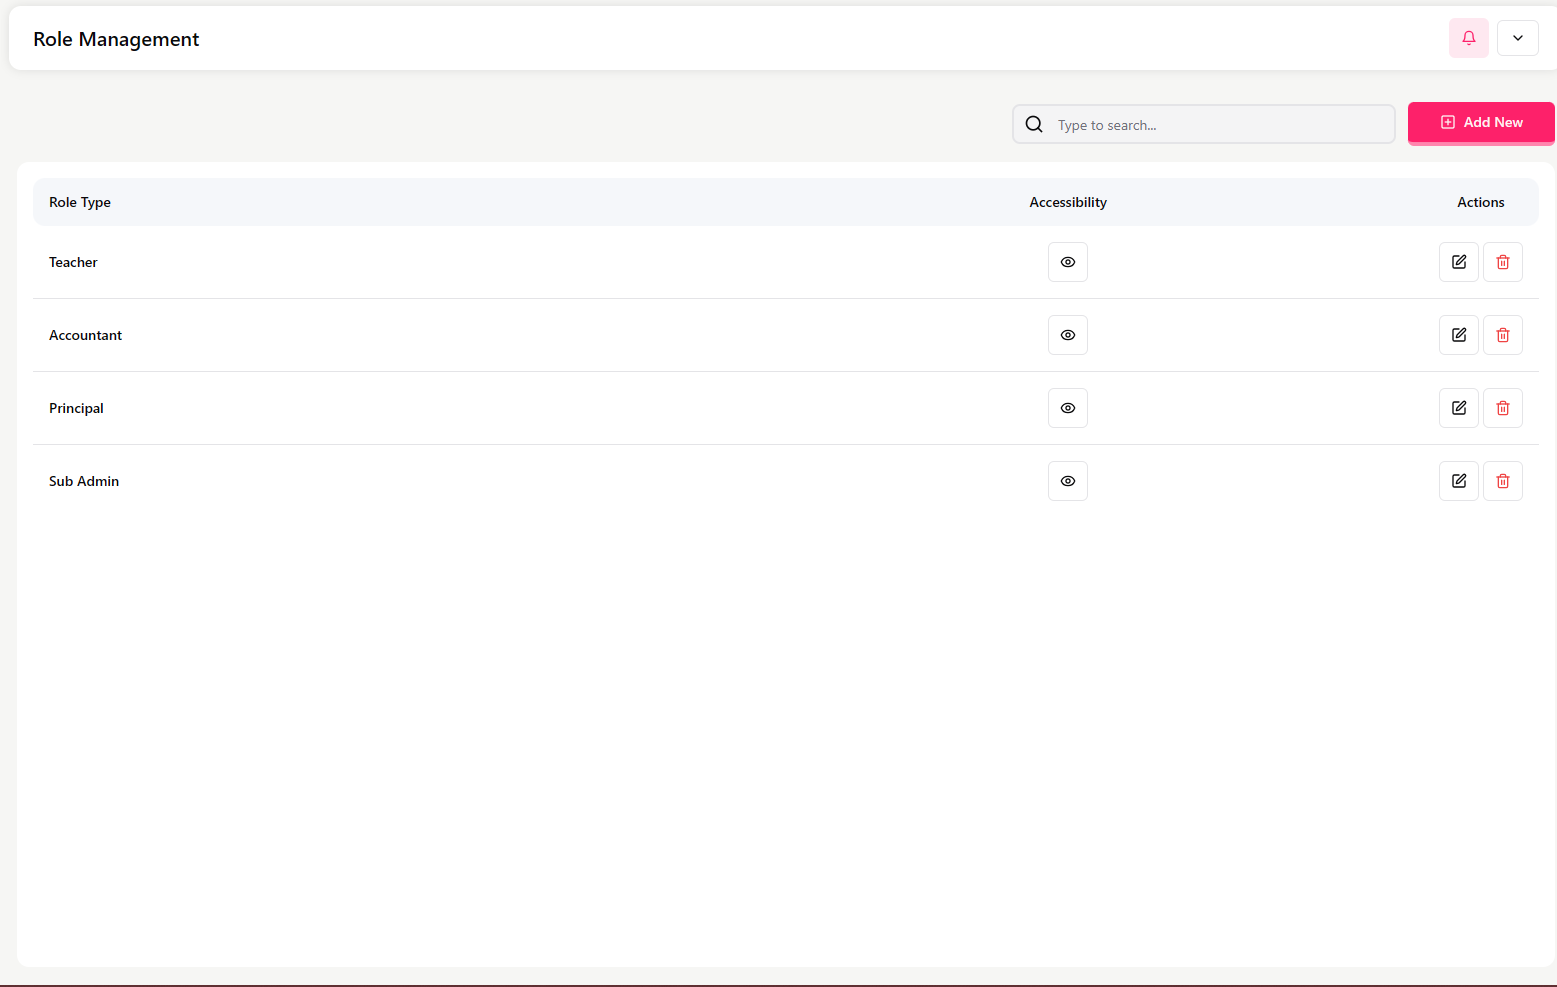
Roles List Screen
This screen displays all available roles with:
Role Type (e.g., Teacher, Accountant, Principal, Sub Admin)
Accessibility (user access level)
Actions (View / Edit / Delete)
Use the search bar to find a role.
Click Add New to create a new role.
View Accessibility
Click View under Accessibility to see which modules and features the role has permission to access.
This helps understand what the role can do inside the system.
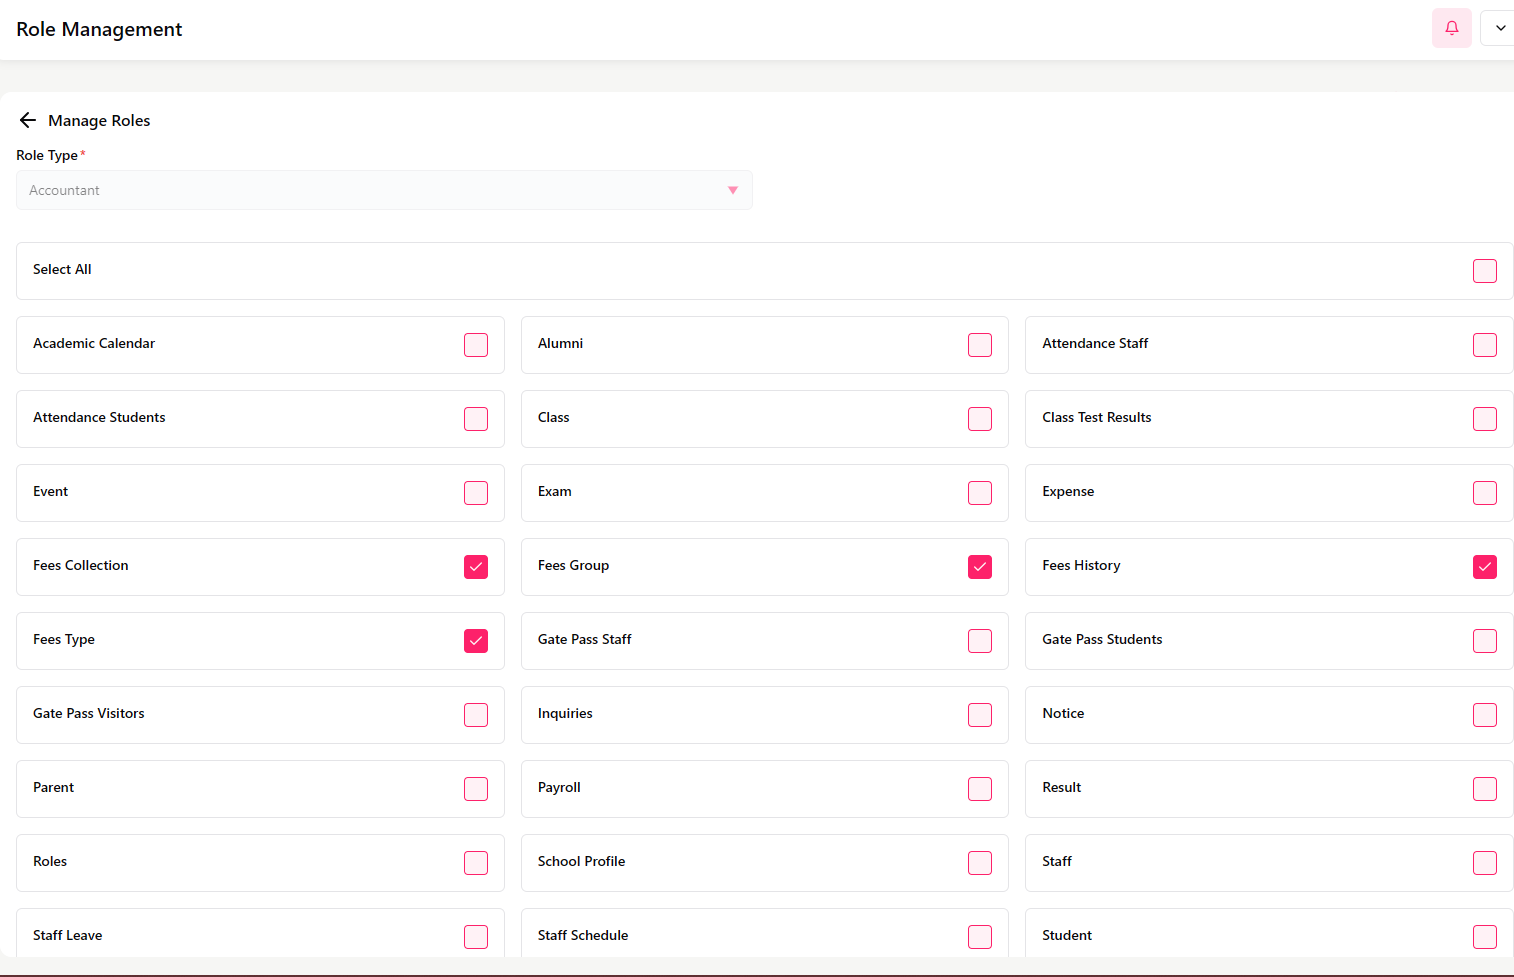
Edit Role Permissions
Click Edit to:
Grant or remove access to modules such as:
Attendance
Fees Collection
Fees Group
Fees History
Fees Types
Exams
Students
Staff
Notices, etc.
Click Save after updating permissions.
Delete Role
Click Delete to remove a role if it is no longer needed.
Note: Be careful while deleting roles that are currently assigned to users.
Important Notes
Roles control what users can see and do in SSMS.
Proper role configuration ensures system security.
Always review permissions before assigning a role.
Inquiries
Purpose
The Inquiries section allows the admin to:
View messages or inquiries submitted through the system
Track contact details of the person who submitted the inquiry from from school website
Remove inquiries after review
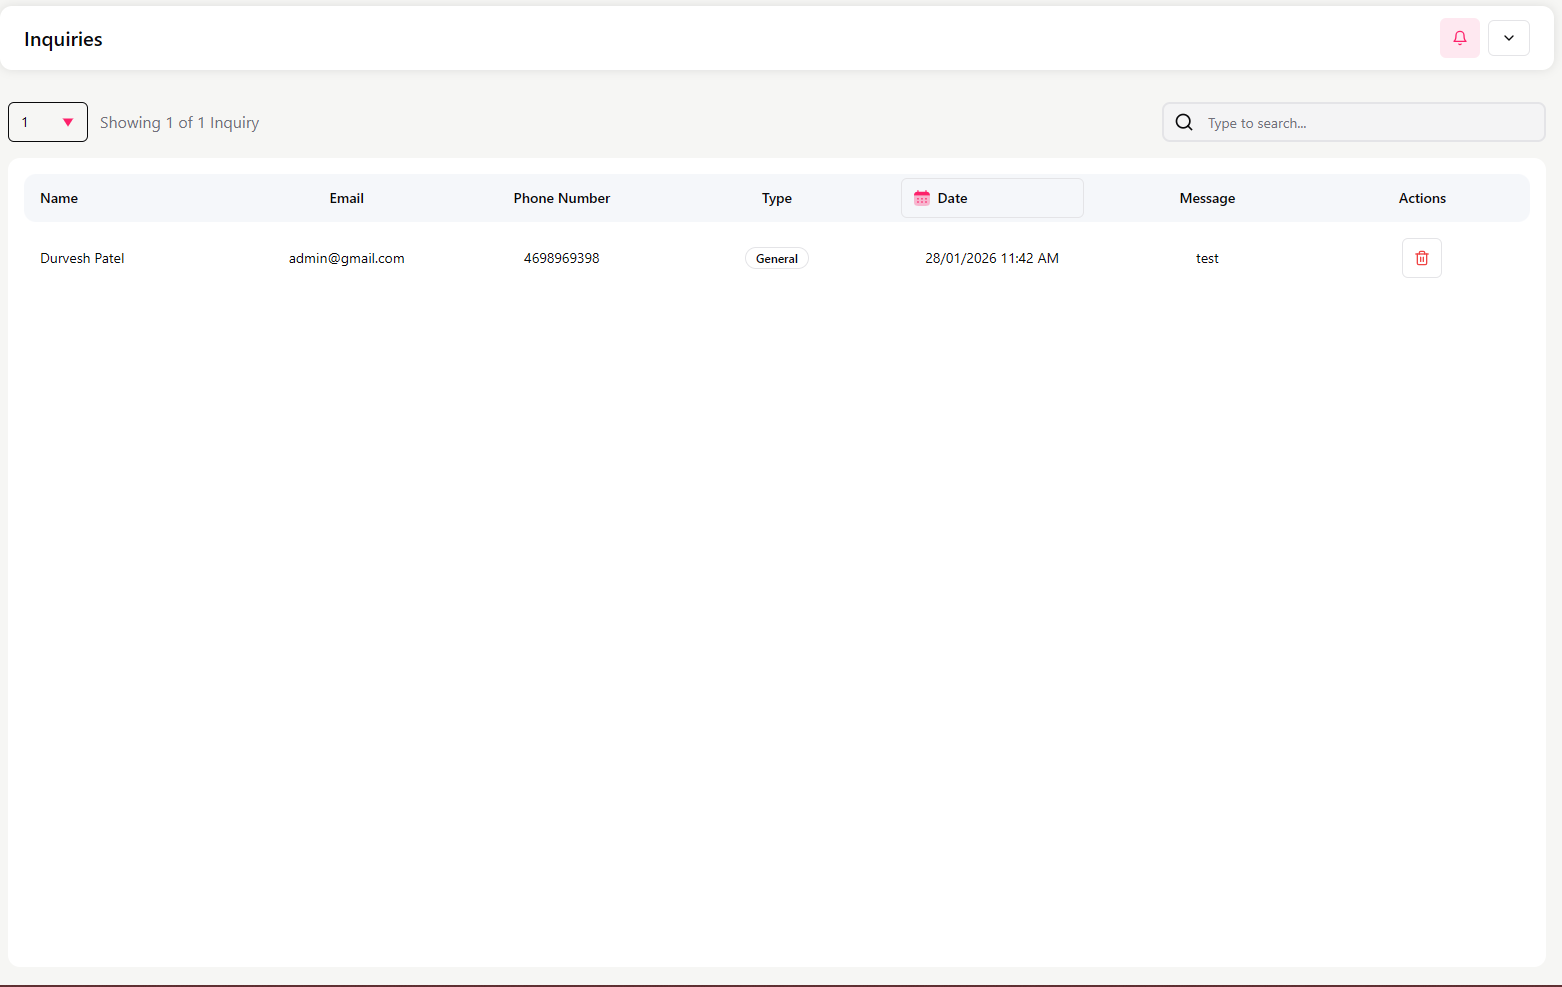
Inquiries List Screen
This screen displays all inquiries with:
Name
Email
Phone Number
Type (e.g., General)
Date and Time
Message
Action (Delete)
Use the search bar or date filter to find an inquiry.
Manage Inquiry
The only available action is:
Delete – Remove the inquiry after it has been reviewed
Important Notes
Inquiries are read-only records.
Once deleted, the inquiry cannot be recovered.
When to Use This Module
Use the Inquiries module when:
Reviewing messages received from users
Cleaning up old or resolved inquiries
Settings
The Settings section allows the admin to configure:
School profile and contact details
Academic year and calendar
Leave allocation rules
School shifts and timings
Personal preferences and notifications
School Profile
This section stores basic school information.
You can configure:
School Name
Registration Code
School Logo
Contact Number and Alternate Number
Email and Website
Established Year
Owner Name
Medium Type (English, Hindi, Marathi, etc.)
School Address
Academic Year Configuration
Define the academic session:
Academic Year (e.g., 2025–2026)
Academic Year Start Month (e.g., June)
Academic Year End Month (e.g., March)
This setting affects exams, fees, attendance, and reports.
Yearly Leave Allocation
Set how many leaves are allowed per staff type:
Leave Type
Number of Leaves
Casual Leave
23
Sick Leave
32
Half Day Leave
2
Maternity Leave
3
Paid Leave
3
School Shifts
You can define multiple school shifts.
Example:
Shift Name
Start Time
End Time
Morning
07:00 AM
12:00 PM
Afternoon
12:00 PM
06:00 PM
Use Add Time Shift to create additional shifts.
Academic Calendar
This section shows the Calendar for the academic year.
You can:
Navigate month-wise (e.g., June 2025)
View holidays for each month
Plan school events and activities accordingly
My Preferences
This section allows you to:
Enable Web Notifications for system updates and alerts
Important Notes
Settings should be configured before starting daily operations.
The academic year and shifts directly affect the timetable and attendance.
Keep contact details and logo updated for official use.